Showing posts with label project. Show all posts

Wednesday, October 12, 2011

Upcycled Rice Bag Pillow

Ta-Da! As promised (to myself) I made a quick & easy craft today - one I've been meaning to do for awhile but yaddayaddablah just put it off along with everything else.
Anyway, I've made a cute decorator throw pillow upcycled from a rice bag.


I got a buncha cool ricebags from my friend Patricia over the summer, and I figured I'd either make a tote bag or pillow out of them - the pillow seemed easier and quicker (and just all around more doable with my limited patience and sewing skills)

This one was a practice run with the smallest of the bags - and while I could have gone the "Super Easy Cheaty Route" and just stuffed it as-is with fiberfill and zipped the sucker closed, I didn't! I cut off the top portion with the zipper and handle, re-sewed around the entire perimeter with a straight machine stitch, filled it with polyfill, then sewed the top shut. It's a bit wonky (Unstraight Threadlines! hello, good buddy!) and the top is kinda "rustic" with it's ravelled edging, but I think it turned out cute enough for what was literally a 20 minute top-to-bottom completed project. Including the 5 minutes it took me to rethread my sewing machine, which I still have to haul out the manual for cuz that's how often I use it :D


I ran outta polyfill so I only made the one, but since that was my goal, I'm happy :) And I plan to do a bit more involved of a job on the others and might even use pillow forms on them - we'll see!
Let's hope this is the start of a nice, productive, creative roll for me ...

LATER!
~ gem ~

Saturday, April 3, 2010

Corkboard Project


Corkboard Project 5
Originally uploaded by gemgirlart
Hi Hello Howareya?!

And yes this is my first blog post of 2010, so Happy New Year as well!
(I'm so lame. and full of shame. and take the blame!)
Anyway I worked on this lil project last month and wanted to quickly share it with you ...

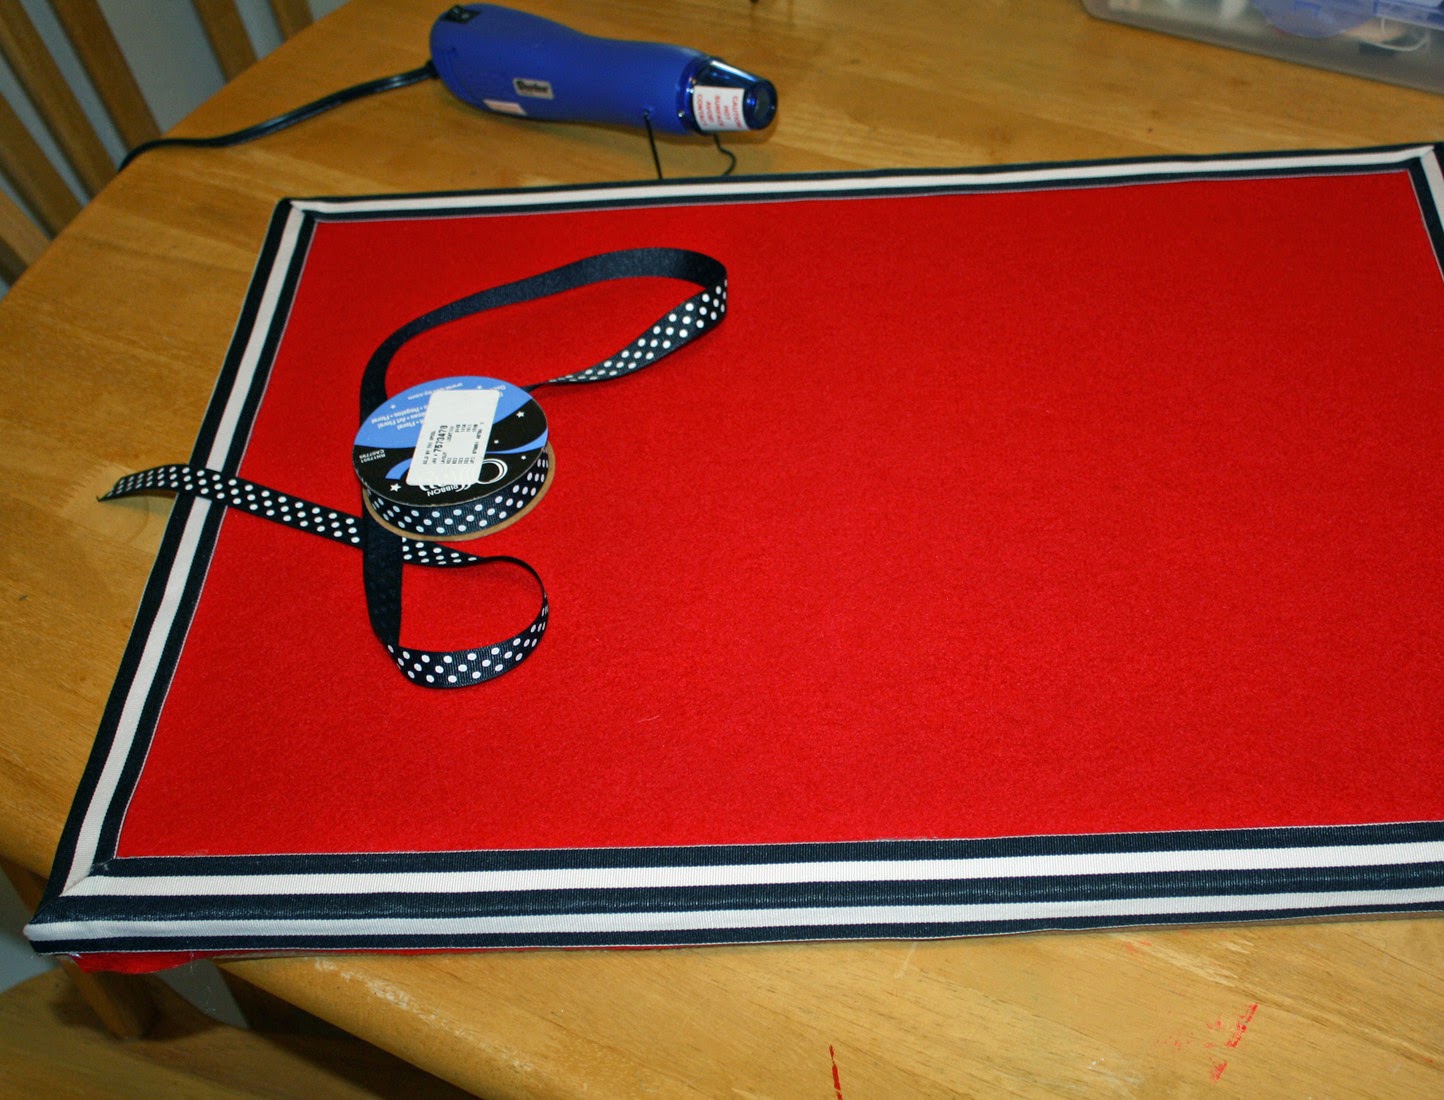
I had an inspiration board hanging over my sewing area - only it wasn'y very inspiring. Plain 'ol wooden framed, cheap mass market cork message board - nice size but corkboards always piss me off due to the fact theres hardly any cork on em! it's like a millimeter thick layer then ya hit particleboard - bah! altogether maddening. I also tried those "cork only" squares that supposedly you can attach right to the wall with doublestick tape? Uh, no. ya can't. I hate that stuff, anyhow, but it was a nice thicker piece of cork, SO! one day I decided 'Hay! Why don't you combine the two?" - and here is what I did:


1) Since the original board was rectangular and the cork squares were, well - square - I had to cut them to fit. Ruler & craft / utility knife were a must!


2) Since I'd be cutting and attaching the cork squares to the wooden framed board and there'd be a buncha ugly seams leftover, I decided I'd also go ahead and cover it with fabric and edge it with ribbon, too. This would also make it way easier to reattach my button collection to the outer edges of the board (through the fabric ribbon instedda into the cork - brilliant!)

3) I went with a nice piece of better quality red felt for the backing and I have this FAB wide roll of B&W striped fabric ribbon to use for the edges, and decided to also add a second coordinating ribbon (B&W polka dots, narrower width)


4) Used plain ol hotglue to attach everything as it was really the easiest, most secure way - plus I'm super impatient, so - yeah. Cut & glued the cork pieces onto the board, within the framed edges - and cut my red felt large enough so that it would wrap just around the back edges, making sure to pull it evenly tight at each side as I glued it down.

5) Cut lengths of the wide striped ribbon to fie the edges/sides and running a thin line of hotglue tacked those down, mitering the corners so it looked nicer. Since it was striped it was pretty easy to keep it straight & even (though I didn't get it 100% on the top edge, but hey! that's how ya know it's handmade with lovvvve, heh.)


6) I ran a length of polka dotted fabric ribbon around the entire edge of the board in one piece, just putting a quick thin line of hotglue and keeping it stretched taut as I pulled it round. That's it!


Reattached my buttons and hung it back on the wall.
Happy fun project, that's ready to hang more inspiring bits upon -
Have a hophop Happy Easter tomorrow, friends!
XoX, gem

Tuesday, October 6, 2009

Paper Alpha Project

Finally! A new post, and a "new" project :)
Follow along if ya wanna make something similar (not that ya couldn't figure this out on yer own, I mean really. How easy could a project BE?)

Paper Covered Wooden Alpha Wallhanging

STEP 1


Choose your letters and papers. I'd wanted the word CREATE to hang above my artspace, and my kids got me the letters for like my birthday or Mother's Day (LAST year.) and so I already had them here. Mine are white-painted wood and about 7" tall. If you've been to the craft shop or discount store you KNOW they have a dozen styles to choose from, so just get whatever size or type you like! Then I collected up some semi-complimentary scrapbookpapers, but you could use bits from your scrapbox, vintage book pages, wrapping paper - whatever!

STEP 2


Apply adhesive to the FRONT of your letters. I used gel medium, but you could use whatever type of glue ya want - even a gluestick. Yep. Gluestick.

STEP 3


Lay your letter facedown on the paper - I'd precut mine to about the size of the letters, and lined up at least one edge, just to make the cutting easier and to not waste too much of the paper. You can also hold it up to the light and see if you like the "arrangement" of pattern on the letter and if not scoot it around - if ya use repositionable glue - that, or figure your approximate placement before applying glue. I didn't care so I just went with the "however it lies" approach :D

STEP 4


Press down real good! You want your paper to be really well adhered to the letter, so make sure you press out any bubbles & wrinkles, and really get the edges good too.

STEP 5


I had a sort of assembly line process, so once I did the previous steps for each letter, I stacked'em up to let them dry. I actually let them dry/cure overnight, but not for any benefit - I just ran outta time to work on them any further the 1st day :D But yeah, they should be completely set & dry before ya cut.

STEP 6


Cut away the excess paper. Now, the way you do this is kinda up to you & however you find it to be easier. I used a craft-knife and laid the letter flat & facedown on a cutting mat, and trimmed around the edges. I found it to be a little hinky 'cause the wood was pretty soft and my blade kept digging into it. So on some I tried using scissors on the edges, and the blade to cut out the middles (like on the A and R) - I say it's your choice because no matter how you trim the paper away, you are still going to have to do the next step:

STEP 7
(for which there is no picture cause I was so busy and focused on it I forgot to take one.) But you need to sand all the edges now - both to remove any leftover hangy-bits of paper, and to sorta age the edges a bit (if that's a look you wanna go for). I used a foam sanding block - I think it was actually a nail file thing for fake nails, but it works great cause it's flexible and can mold to the shape of the letters plus it's got a few different "grits" of sanding material. So anyway I just used that to rasp off whatever paper was uneven or leftover along all the edges of the letters. I also took this time to reglue any loose paper along the corners and edges. There weren't many 'casue I'm a pretty good gluer :-p

STEP 8


Now you can skip this step if you want, like if you used really pretty coated or fancy papers or something - but I went ahead and sealed mine with some acrylic sealer - I used matte finish here but you could go gloss or spray it with glitter or whatever the heck!

VOILA and FINI!
You are now ready to hang your fab new motivational phrase (or kids name or house numbers or whatever you made!) on your wall - go for the funky haphazard "drive a nail and hang the letter" approach or do the anal retentive thing and use a laser level and snap a chalkline (hello! - waves to all you Type A's out there - hehe) All I really ask it that you #1) don't wait a year to complete this super simple project like I did, and B) ENJOY IT!


*plus I dig that if you mess up or just wanna do a different look later- you can just yank'em down and recover with something else! Like you don't have about 169 pounds of random scrapbook or saved papers lying around to pull from. You know you doooo. And they're just sitting there. Mocking you.

SO MAKE THIS CRAFT. TODAY.
or at least this weekend ;-)


xox, gem


*** UPDATED APRIL 2014 ***
Just to show you - I've since re-papered those letters (a couple years ago actually) and moved them into a different spot:


Plan to do a studio room tour in the near future! so you can see this whole space :)

Wednesday, December 10, 2008

Christmas Clothespin Card Clips Craft


This may be my one any only blog posting for December, so may as well make it a holiday craft post!

This is for a fun, fast and VERY easy (and cheap! Hello?!) holiday project that you can do to create a nice display for all your holiday greeting cards. I saw this in Martha Stewart Living magazine, December 2008 issue in the Good Things section ...

Basically you take some wooden clip-style clothespins and some scrap wrapping paper (or any paper you want ... I coordinated by using wrapping paper that matched my Christmas decorating color scheme for this year: red & white) a good gluestick, a sharp craft knife and a length of ribbon or cord.

Slather one side of a clothespin with the gluestick, place it firmly down on your wrapping paper (on the backside, obviously, so the pattern is on the front of the clothespin) let it dry a bit, then cut around it with your craft knife to trim away the excess paper. Repeat on other side, and for however many clothespin clips you'd like to make. String a length of ribbon or cord wherever you'd like to display your cards, and start clipping 'em on up!


Merry Christmas!
xox gem xox

Wednesday, September 3, 2008

Collage Play with Crowabout

I recently joined an online collage-challenge group:
Collage Play with Crowabout ~ Nancy Baumiller's Flickr group for weekly collage challenges. She supplies us with a collage sheet of random images once a week on Saturdays, and we have until Friday to complete a collage piece of our own using those supplied images.

We're supposed to use at least three of the images in our own piece (though ideally you'd use them all in some fashion), and any other images or mediums are not only allowed but encouraged. I've seen many people use their own imagery in both handpieced paper collage as well as many wonderful digitally produced pieces - however these are my own self-imposed rules for my weekly pages:

1) Must use each & every image Nancy suplies (whether in whole or part)
2) Must use ONLY those images! no other printed or found images or items
3) Tools and media allowed such as paper punches, paints, markers, pens, chalks, etc.

Thought I would use this past week's page to do a step-by-step procedure posting on how I create my pages, which I am doing in a 10" by 7" spiral bound journal book. And here we go!

First thing I do of course is print out Nancy's collage page, on a letter size page of plain white cardstock. I usually adjust the brightness and contrast a bit in Photoshop first, so that the printed images are clear and bright. Then I color my page background, using either watercolors, pastels (chalks), art crayons, or - as in this case - direct to paper inking. I just randomly apply color in two to four shades, contrasting or co-ordinating depending on my whim of the day:


I then cut out all the pieces as they are on the page, and start figuring out what can become what. At this point I don't usually have any idea for an overall page theme or design, I just let it come to me as the individual elements work themselves out. Right off the bat here I see the two orangey striped triangles as legs, and as I try to incorporate a character or figure into all my pages, I know that's where I will start. I cut out bits and pieces until I've created these folks:


I like'em! but now what? Originally I'd intended to use the partial clockface as an umbrella, but once the figures were done I decided I would make it into the arch over the top of a doorway, which led to the idea of having the couple welcoming the viewer into their home. This is where I used the leftover sliver of home interior image and the large wood piece to create the doorway and door. I didn't like the blue BG showing through, so I painted behind that with a mix of ivory and burnt umber craft paints. Though it now looks as though a waterfall is pouring through their entryway - eyeroll

Now my page theme is taking shape ~ I see the cracker images as headstones, so I cut them smaller and add a bit of the text imagery for the "names" , and I decide to stagger them along a path of some sort ... I used the chickenwire image as a fence, and drew in my own path, utilizing my horribly disjointed sense of direction and perspective (is it a tomb tree? a funnelcloud? Jack's beanstalk, or what?!) to make a pathway meandering through the couple's yard, littering it with the dead along the way ...


Finally I add my *handwritten text (PITT pen): "The Bailey's Welcomed Everyone to Stay ... Permanently ..." to show my charming couple inviting you to enter their home, 'cept you don't realize there's only one way out and it ain't the way ya came in!

I also outlined everything in white Signo gelpen to help it standout - and I ink all the edges of the individual pieces with shades of brown before they are glued down to the page, using either Sharpies or inkpads, depending.

Now, I love the couple! and I like the "story" behind it, but overall I don't care for the entire piece as a whole. Yes, I AM my own harshest critic, but don't feel you have to comfort me or boost me up! - 'cause while I am definitely hypercritical, I am also usually my own biggest fan and that side tends to win out in the end : )

*One of the group members had asked for input on how everyone was doing their hadwritten journaling on the pages, and this is what I sent her, thought I'd included it here too for anyone else interested in my own lettering process ...

Take care now and havva GREAT day!
~ gem ~

-------------------------------------------------
First, get some good gel pens and markers (I like Signo gelpen in white, PITT ink pens or ZIG Millenium memory book writers, and of course SHARPIES - note the new Sharpie pens, they are fine line Sharpies in black or blue ink but no bleedthrough on your paper ...

If you look at my 2 most recent Crowabout collages, they both have lettering I did freehand right to the paper. And you can really tell the difference between those and the previous 2 which I did in my USUAL manner of writing, which is:

1) After the collage is done, I write out my text on a piece of scrap paper until I get the exact wording I want.

2) I take a thin sheet of writing or drawing paper (or tracing paper if need be) and lay that over the section of the collage that will be journaled on, drawing an outline of the basic shape of the area in pencil. Then either using a ruler or freehand (depending if I want say, curvy or shaped lines of text) I mark out my lines -

3) I practice writing my text block (still in pencil) on these lines until I get it layed out evenly and spaced how I'd like. Once I'm happy with it -

4) I carefully and LIGHTLY draw pencil guidelines on the collage itself. Then I copy the text from my practice page onto the collage in pencil, (just by eyeballing it, making any adjustments if need be) and once I have THAT done and am satisfied it's exactly how I want it, I go over the lettering in my choice of pen or marker.

5) Gently erase all the pencil marks including the guidelines (this can be a bit tricky if your BG is in say chalk or pastels like alot of mine are!) and then go over the letters again in your pen/marker, this time adding little flourishes or thickening the edges, etc ...

6) Accent with another color marker or outline in contrasting ink, whatever you want and TaDa! you've handlettered your page!

I know it sounds like alot of work and while I don't do EVERY page like this, it is how I prefer to do it (but that's cause I'm a nitpicking perfectionist so take that for what it's worth), but I think you can see the difference in those pages where I have done my method VS freehanding it all the way ... all in all it's at the very least good practice at lettering so that eventually you'll be able to just write away directly to your pages :)

Hope that helps give you some idea of how to go about it and that you see not all of us are supremely talented at journaling and handlettering - we gotta work at it! (though I do envy those who can just straight up write the page out freehand and have it look all font-perfect, grrr!)
-------------------------------------------------

Saturday, May 24, 2008

Beanbag Bunch


Beanbag Bunch
Originally uploaded by gemgirlart
So! Remember that sewing machine I got for my birthday - LAST YEAR!? Well I finally, finally got around to getting it out and learning how to operate it (in the most basic of basic ways!) In the past year there's seriously just been NO time, and even LESS space for me to go about learning to sew on this thing - especially as I am one of those spreader-outter, leave-it-in-place-while-working-on-it-until-it-takes-over-the-kitchen-table/diningroom-kidsplayroom,etcetc type of artist-crafter. But I just finally decided that the only way I was going to learn to use it was to assign myself a project that needed doing, and that had a specific purpose and more importantly, a DEADLINE.

That project turned out to be my volunteering to sew a batch of beanbags to be used during one of the games at our 5th Grade end-of-year class party. (see previous post regarding THAT li'l shindig ...) I bought the supercute fabric from Jeanelle at Charmpacks and a big bagga beans (pintos, if you really need that info), looked up a basic "how to sew a beanbag" tutorial online - and awaayyyyy I went! I did sew a test bag first outta some scrap fabric I had here (the yella one, there on the bottom), which came out well enough that I was comfortable moving on to the good fabric - Oh, precut squares, how I adore thee! So no, they aren't the neatest most perfect beanbags ever (hehem, do NOT look too closely at those top seam edges, thennkyewww.), but I made them my very own self, and completed (one of) my promised projects for the games committee, AND learned how to sew a little bit on my long-lusted after sewing machine. Whatta proud, proud day for me :D

'Cept now of course my kitchen table is filled with piles of fabrics and wads of thread and scissors and a rather nifty appliance that most certainly does NOT belong in the kitchen ... Welp! SEW WHUT! Nobody ever said eating AT a table was the law or nothin'! :D

Later, ya'll - I got about a million things to do still (wanna help me paint some 6' tall saguaro cactuses? Meet me in the garage!)

~ gem ~

Monday, February 4, 2008

Ok, Who Hit the Hyperspeed Button

on 2008? As in: How in The Hell is it already February!?

I seriously cannot deal if this is how fast the year is going to go by, and me having not remembered any of it passing. It just doesn't feel right, at all. An' I don' like it, nope!

BUT. I have managed to finish up a few things - I finally! mailed a long overdue care package to a fellow artfriend from Nness who needed cheering up ... My painted BG papers and rubberstamp images for a Yahoo group swap (that were due in Nov. Yeah, I'm a leeeetle behind shedju-uhl) are ready, but I still have to complete some decos that need to mail with them. Sigh.

I still owe a "PIF" from this very blog, that I said would be going out last month - not ready. I have a new series of zetti-inspired creepy eye collages that are totally stalled about a quarter way in since I've had no time to work on them. I need to do a major artroom cleanout, or I will never even find them - or anything else I need to work on. I owe my son a long-promised workday of listing some stuff on eBay, or at least a how-to lesson so he can do it himself. I have not taken and thusly, not uploaded, any new pics to Flick'r in soooo lonnng (and that makes me soooo sad) -and- I have three major family birthdays coming up at the end of the month - all within about a week of each other! plus I'm heading up the ice cream fundraiser at my youngest's school which puts me in the cafeteria every Friday during all lunches. (Yeah, WHAT was I thinking when I signed on for THAT? Answer: I clearly WASN'T.) eeeeeeeeeeeeeeeeeeeeeeeeeeeeeee.

In the good news column: I HAVE sold three prints of my collages: two on eBay, one on Etsy (my 1st ever Etsy sale, w00t!) - and intend to get some new ones listed really soon, the plan is to start focusing more on Etsy listings since eBay has disappointed me too often of late.

Thats enough updatey for this month - I meeeean, today ;)
See ya next time, and hopefully sooner rather than later!

~ gem ~

ETA: Almost forgot! My mom got me a Roomba for Christmas and while I used to look at them and smirk thinking "yeah, riiight" - Oh.My.God. if itsn't the best thing ever, I lovvvve it! It's been sweeping up my tile floors the whole time I've been working up this post. All hail ROOMBAAAAA! Shweeeeee!

Wednesday, January 2, 2008

Happy New Year!

Pop-in posting (a day late, 'natch) to wish you all a happy and healthy New Year ... Our holidays were wonderful, things slowly returning to some sort of normal, though I've not worked on any new art since well before Christmas ... looking sooooo forward to when I can back at some creating.

But while I'm on the subject, here's a little something art related - a fellow Flick'r friend is embarking on a neat project for the coming year:
A Million Letters - sounded cool to me and I'd love to see her meet that goal, so please send your postcard or letter and feel free to pass along the link to friends and family! Join the Flick'r group too, if you're so inclined ...

That's all from me for now, back later when I got ... somethin'!, Anything!
Here's to a great 2008!

~ gem ~

Wednesday, December 5, 2007

Dollhouse Deco

"Where oh where did November go,
oh wherrrre oh where can it beeee?"


Welcome to "the Season", I guess. sigh. This will probably end up my only post for December, so ... anyway! On to whatcha came for:

Here's the most recent deco booklet I had the great fortune to work in - made by the wonderfully talented Arrow for Pequad, and currently making the rounds over at Nervousness.org ... It's a beautifully crafted dollhouse themed deco and while I usually shy away from posting other people's work, I really wanted you to see the front cover of this deco (I did ask the maker for permission first, of course!):


It's got great layers of textured and patterned paper, and there's real eyelet curtains in the windows! How cool is that?! The front doors open to reveal two sets of blank pages, for the artists to work on, which are also house shaped. The recipient for this deco, Pequad, uses a Kewpie doll image alot in her work, and it's also her icon/mascot on the Nness site, so that was my starting point for my page idea: I was going to make a Victorian inspired house and somehow incorporate little "pequad" dolls (sidenote: I remember once she told a story about how she got her user name and it involved Kewpies and how her family calls them pequads - for some reason that I forget now. Anyway that always stuck with me and so whenever I see a Kewp I automatically think "pequad") I took a sheet of patterened scrapbook cardstock weight paper that I thought looked wallpaper-y, and aged it a bit with an acrylic paint wash, then did the same thing with some scraps to make floor dividers:


I printed some vintage images of household furniture and items in greyscale - and in an effort to be unique I decided I was going to make my page interactive, so! I made little pockets on some of the furniture pieces: The chaise, chair, cushion, bathtub and even the hatbox in the attic all have little pockets to tuck the dolls into. Actually the seat area of the chair was too small for a full usable pocket so it has a strip across the front that will hold the doll in place. I made the pockets by printing a double quantity of images and once I had cut the item out I then used the second matching image to cut the pocket section from, and glued it down to the full piece, making sure to leave space for my dollies to fit into! And that brings us to:


I wanted this deco page to be very personal to the recipient, so - I actually have in my possession an old vinyl Kewpie doll that I took pics of (I got it awhile back cause I planned to make something out of it, came in extra handy for some printed projects ... ) and I used those as my dolls. What you don't see here, because like a dolt I forGOT to take pictures of this! GRRR. - is that I made a backside image to the dolls as well, mmnhmmm, with their lil beehinds showin' - then I sandwiched them together with a length of ribbon in the middle that would later be attached to the page so you could put the dollies in the various pieces of furniture, but not lose the dolls. Cute, right?! I added wings that I painted with iridecent paint (yep, those have backs too), and then as a final touch I made each dolly a crown and a party hat - one to wear, one to keep up in the hat trunk in the attic.

Once I had all the pieces done, I glued the other end of the ribbons to the backside of the room page and added a top layer of text weight paper just to cover the ribbon ends - then glued the whole thing down to the blank page in the deco booklet. (Waiting in between steps for all the glues to dry & cure, of course!) I wanted this to be a special page and I feel really lucky that I got to start the deco off, so now all i hope is that she likes it and that all the little interactive bits hold up and work as I intended ... and I know it looks a little weird with the doll's feet disappearing into the chaise, but it was the best I could do! :D


Oh yeah! And after all that, know what's my favorite part of the deco? The last-minute addition of the framed family photo in the "Parlor" - it was originally going to be an old cross stitch sampler but luckily a more creative idea surfaced before I glued it down ...

Later, I got another project I gotta get back to, so maybe I'll have something new to post in a few days after all! Seeeeeeyuh!

~ gem ~

Tuesday, October 30, 2007

AFC Pink Inchies

Here's my first step for the process of a new project I am currently working on: Pink Inchies - created for a charity art auction for breast cancer awareness via Art For Cures, which is run by the super talented, ever-creative, fount of seemingly endless energy Renmeleon (Ria) ...


I started with a 9x12 sheet of 140lb watercolor paper I prepped using my salted watercolor BG technique, using some metallic pan watercolor and a bit of red-pink tube color that I watered way down and used as a wash on parts of the front as well as the entire reverse of the paper, to give just a bit of color to the back of the pieces instead of leaving them white (I don't feel a piece is really finished unless I've done something to the back as well, so most of my paperart work will usually be arted on both the front and back in some way)


We're supposed to be using Ria's "collage 88" technique, in which you collage your entire work on one single 8.5x11 paper then cut it up into 88 inchies, and then add any embellishements or whatever. Which is actually the way I normally do a set of inchies anyway (paint, collage, etc an entire BG sheet, then cut the squares, then add "extras") I'm just using a larger sheet of paper, which should yield more inchies, right? Yeah well, we'll get to that later ... So I start collaging (now remember the color theme of this project is shades of PINK, with some minor black, white or silver the only other colors allowed) with pink shaded papers from my stash (some KoolAid stained sheet music and papertowel bits, some tissue paper and pink mulberry scraps) - and here's where I make a mistake right off the bat.


I end up almost completely covering my beautifully textured shimmery pink watercolor background! I shoulda (coulda, woulda) collaged on the BACKSIDE that had the plain pale pink, and let the pretty side be the reverse which would show nicely under the backplates but! Oh well, too late now, yeah? So I was kinda GRR'd about that for a bit but let's just move on ... Once I finished my collaging - and yes that last picture is it, I didn't do a whole lot of collaging as far as the actual design, more just a buildup of the background - I decided against any rubberstamping or doodling on the whole (though I had originally planned to splatter paint a little bit at this point, to help tie all the collagy-ness together a bit better - but, well, I just forgot. Woops.), so I went ahead and proceeding to the cutting them up stage:


And here's where mistake number two rears it's head. From a 9x12 sheet of paper I should get 108 individual inchies (88 to send in for the swap, plus a nice batch of extras to provide the host some more material for the auction goods) But for whatever reason, the last 2 strips or so do not come out to be a full inch wide. Did I make a mistake and cut a tenth of an inch too big on some earlier strips? Is the trimmer in need of a new (whatever the little rubber cutty-strip piece is called? and the answer there is YES, it is. I think I have maybe one good edge left on it before it's totally shot) Can I just not measure correctly? (also a yes.) So anyhow I'm left with approximately 94 inchies all told and not even all of those are compleeetley 1" square (grr.) so I just barely squeeked in my 88 pieces from that sheet. And here they are, remixed in no particular order:


So that takes care of step one - step two is the addition of my "goddesses" and any further embellishments and doodly funstuff. Which I need to get a move on with since these are due to Ria pretty much by week's end (!) And I'll post that process later ... maybe ...
~ gem ~


UPDATE - Here are the finished inchies!


Monday, October 22, 2007

Watercolor BG with Salt Technique

Finally getting this how-to done! Although the actual process pics and pages I am showing you today were made back in May, I am just NOW getting around to them ... but I am working on another piece right now that started with a "salted" watercolor background paper, so before I post any tutorials for that one I figured I better get the steps for the background technique posted first ...

I always use watercolor paper for these, but I will use anything from the nicer 140lb coldpress to just a sheet from a cheap discount store watercolor pad. I typically make these background papers in batches of 3-6 pages at a time in maybe one or two color variations, on days when I am bored or don't have any other pressing projects to do. (Some days just scream "make backgrounds!" you know?) Then I have a nice stock of papers to go to when I need to start a new project later. (I also do the BGs for several pages in my journal books at the same time, since I already have the stuff out. It's nice to open the journal and have a whole bunch of pre-colored pages to work on)

I assembled the supplies I'll be using and laid them out on newspaper:

Sheet(s) of watercolor paper
Assorted watercolors - tube paints, watercolor cakes in regular and metallic (Coloriffic Metallic Shimmering Watercolors are a poor-mans Lumieres / Twinkling H2O's!)
Paintbrushes - I'm using the 1" hardware store nylon bristle type for the tube colors, and a smaller half inch brush for the cakes
Pan of water and small spray bottle of water
Cuppa salt! I only use kosher salt (the kind you cook with) though probably sea salt or any course salt would work too. You can try table salt but I think all you'll get with that is some pretty sandpaper ; ) WHICH! could be cool in a project too, so - I dunno, try it!


I start by wetting my entire sheet of paper by spritzing with the spray bottle then spreading it with a brush. I apply my chosen colors either straight from the tubes onto the paper or (in the photo shown) by using the pan colors that have been pre-wetted. I just randomly add color with the brush in an abstract fashion, sometimes adding a bit more water, and letting the paints run and bleed into one another until I have the mix and coverage that I want. *With the direct from the tube method, I squirt small dollops of paint randomly about the page and then work them together and into the paper with the brush. I usually let this stage get jussst this side of dry, then I take the spray bottle and spritz a bit to add droplets that will bleed and blend the colors even more. THAT itself will add little waterspots (you can vary them by applying the spray in a fine mist and larger splat-drops - sometimes I get it dowright wet, just depends on my mood really) and if you want you can stop here and let it dry and that will be a very fine BG paper


But I like to get a much more marbled, waterstained effect so this is when I add my salt - while the paper is still a bit damp - just sprinkling small handfuls all around, 'til I'm satisfied with the amount. The salt crystals wick up the remaining "pools" of water, along with some of the paint pigment, in whatever little spot they were sitting. Wait until the paper is totally dry, then brush all the salt off and voila! what's left behind is a neat bunch of little dotted areas where the salt "ate" the paint & water, giving your page a dappled look, and refining and melding some of those areas where your paint colors met and maybe didn't look so blended before.


Here's the end result on the pages I made that day, including one in a journal (that one I didn't salt but used alotttta water in the paint and just let it pool up together - came out pretty cool) Be sure to click on it to view it at fullsize so you can really see the details.


This is my ALL TIME FAVORITE page background making technique, and I hope you enjoyed reading it (or at least understood what I was saying!) and are ready to get out your art supplies and make some BGs of your own ... Have fun painting!


~ gem ~

Monday, October 1, 2007

Pay It Forward

I've participated in PIF projects at other swap and mailart groups (PIF = Pay-It-Forward, which, in the arts & crafts world is basically: one person offers something up, maybe a small artwork like an ATC or deco or some type of supplies or scraps ... the next person to post claims it then offers their own 'whatever thing' to the next person, and so and and blahblah ) but this was the first one I joined via a blog, and I really like the idea and also liked Sparrow's art and lucked out that I was the last comment to snag hers :)

If you want the breakdown (and I knowww you do) I'm PIF'ing it from Sparrow's Tree, who got it from Blissful Mama, who got it from Not Cherry Pie, who got it from Danielle, who got it from Lori, who got it from Katie (whew!) and I'll pretty much stop there because Katie posts alot and I just couldn't track down the exact PIF thread in her blog ... I don't "know" any of those gals, but have a look at their blogs (AFTER you finish reading this, please, thank you. hehe, 'cause I get sucked away easily too, that's all ...) They all seem to make pretty cool stuff and have interesting things to say ... Anyway! onwards ...

First three people to comment to this post and also pledge to PIF themselves, will get some kind of handmade something from moi within one year (they all say that and I think it's kinda funny, but really - knowing how projects can go, it IS nice to have the leeway, haha!) I promise I'll try to be timely even though it's not my strong suit. And that's it kiddos, see ya later!

~ gem ~

Tuesday, September 18, 2007

Klimt ATC Project

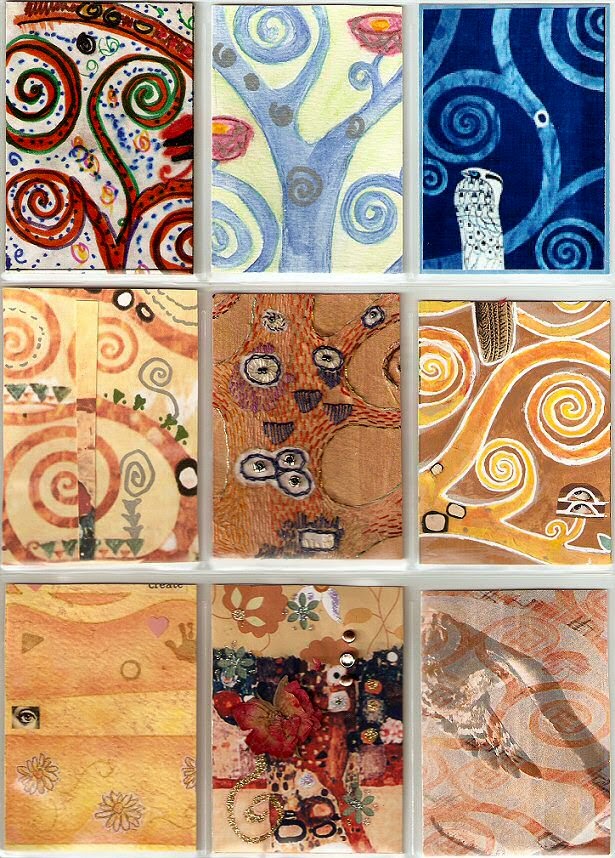
As promised, here is the process breakdown of the ATC project I just finished for a swap at Nervousness.org: "Klimt; 9 Easy Pieces II" ... The hostess provided the players with a downloadable background page divided into 9 ATCs, and watermarked with a major portion of the Gustav Klimt painting "Tree of Life". Players were to interpret it however they saw fit, with the end goal being an entirely new "whole" artwork once all the pieces were swapped and we reassembled our returns. I know not everyone went the same route, but I decided to keep as close to the original as possible as far as shape and overall design. I worked off an image of the original painting from a book I have here at home, Klimt: Life & Work by Susanna Partsch.


I started by printing the downloaded BG onto plain white cardstock (took a few tries to get it sized exactly right) and used a regular old yellow marker to trace the outlines of the tree and branches. I kind of reversed the tree and background colors from the original painting (Klimt's tree is a darker golden brown and the BG is a creamier pale gold/tan, also the ground is a dark brown in his and I used red.) for no other reason than I needed to see the tree form and the details while working, but also wanted it to be easily blended away into the finished piece. I then cut it apart into 9 seperate ATCs and moved on to my next step: Torn tissue paper collage. I used yellow, light orange, red and some aqua tissue paper for this and just randomly tore bits and glued them down with some gel meduim - I wasn't even really following the original painting at this point but just filling in and adding depth and texture. The red paper was very opaque and didn't bleed like I expected it would so I limited how much of it I used.

STEP 1:


After I papered as much as I wanted (I didn't bother with the skinniest tendrils of the branches, just left them marker-yellow for now since I'd be painting it later.) I moved on to painting in the background, using a mix of acrylic paints (I like to use regular ol' craft paints) in assorted browns with some antique white and metallic gold. I did the same thing with the tree and branches using yellows and golds.

STEP 2:


The next part of the process was the longest and most tedious (though that tissue paper section got on my nerves after awhile, too) - the addition of all the little details on the tree and ground. I did a mix of collage and painting here, but mostly collage, using random papers out of my scrap box. EVERY PIECE was handcut, except for some of the stars and circles - they were punched. Though one of my circle punches wasn't sharp so I had to trim the edges anyway -eyeroll-. My original idea was to use an assortment of magazine cutout eyeballs for all the tree accents, but in the end I used those only on the little mushroomy lookin' dudes. I mostly followed the watermarkings and the image from the book, though I did add or change just a couple things. A few dabs here and there of paint to finish off some of the details and to meld other places together, and I was done with the bulk of the piece. All that was left to do was add in some highlighting on the background (mixture of whites and light gold paints) and then I outlined the major sections of the tree and ground with a white gelpen.

FINISHED PIECE:


I tissue paper collaged the reverse and added an info backplate, then scanned'em and packed 'em up for shipping. Like another participant mentioned on her Flick'r page (I know! check hers out, right? how cool is that?), I too wish I had thought to keep one of my own pieces back so it could be part of the final work, but ... who knows, maybe I'll get lucky and get one back in my returns!

Anyway, that's basically it - I had fun on this one even though at times it was tedious work (I managed to score a shoulder rubdown during the last night I was working on it - all bunched up I was!) and I REALLY look forward to seeing the returns and just how they're all gonna fit together.

Have a day, now!
~ gem ~

***UPDATE OCT 2007***
Here are the return cards I rec'd and how they look all put "back" together - pretty cool!