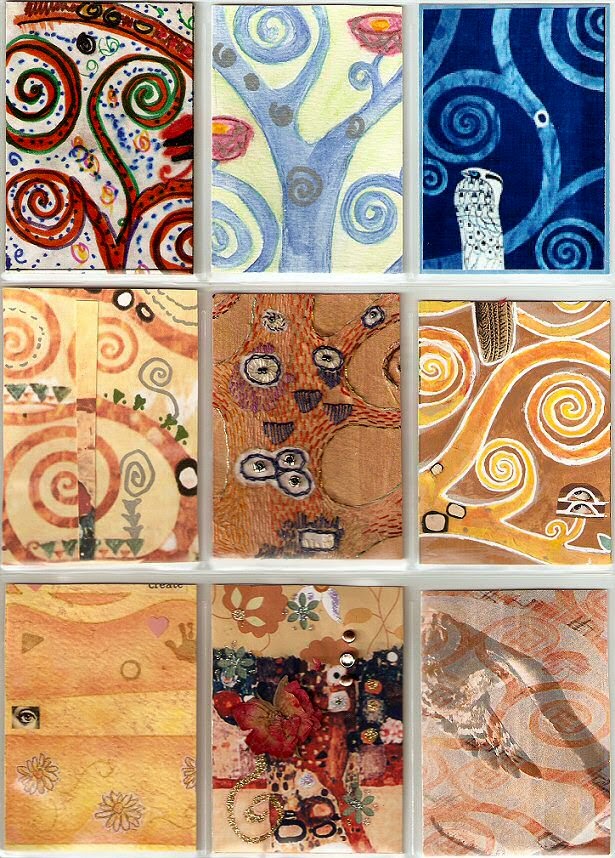
As promised, here is the process breakdown of the ATC project I just finished for a swap at Nervousness.org: "Klimt; 9 Easy Pieces II" ... The hostess provided the players with a downloadable background page divided into 9 ATCs, and watermarked with a major portion of the Gustav Klimt painting "Tree of Life". Players were to interpret it however they saw fit, with the end goal being an entirely new "whole" artwork once all the pieces were swapped and we reassembled our returns. I know not everyone went the same route, but I decided to keep as close to the original as possible as far as shape and overall design. I worked off an image of the original painting from a book I have here at home, Klimt: Life & Work by Susanna Partsch.
I started by printing the downloaded BG onto plain white cardstock (took a few tries to get it sized exactly right) and used a regular old yellow marker to trace the outlines of the tree and branches. I kind of reversed the tree and background colors from the original painting (Klimt's tree is a darker golden brown and the BG is a creamier pale gold/tan, also the ground is a dark brown in his and I used red.) for no other reason than I needed to see the tree form and the details while working, but also wanted it to be easily blended away into the finished piece. I then cut it apart into 9 seperate ATCs and moved on to my next step: Torn tissue paper collage. I used yellow, light orange, red and some aqua tissue paper for this and just randomly tore bits and glued them down with some gel meduim - I wasn't even really following the original painting at this point but just filling in and adding depth and texture. The red paper was very opaque and didn't bleed like I expected it would so I limited how much of it I used.
STEP 1:
After I papered as much as I wanted (I didn't bother with the skinniest tendrils of the branches, just left them marker-yellow for now since I'd be painting it later.) I moved on to painting in the background, using a mix of acrylic paints (I like to use regular ol' craft paints) in assorted browns with some antique white and metallic gold. I did the same thing with the tree and branches using yellows and golds.
STEP 2:
The next part of the process was the longest and most tedious (though that tissue paper section got on my nerves after awhile, too) - the addition of all the little details on the tree and ground. I did a mix of collage and painting here, but mostly collage, using random papers out of my scrap box. EVERY PIECE was handcut, except for some of the stars and circles - they were punched. Though one of my circle punches wasn't sharp so I had to trim the edges anyway -eyeroll-. My original idea was to use an assortment of magazine cutout eyeballs for all the tree accents, but in the end I used those only on the little mushroomy lookin' dudes. I mostly followed the watermarkings and the image from the book, though I did add or change just a couple things. A few dabs here and there of paint to finish off some of the details and to meld other places together, and I was done with the bulk of the piece. All that was left to do was add in some highlighting on the background (mixture of whites and light gold paints) and then I outlined the major sections of the tree and ground with a white gelpen.
FINISHED PIECE:
I tissue paper collaged the reverse and added an info backplate, then scanned'em and packed 'em up for shipping. Like another participant mentioned on her Flick'r page (I know! check hers out, right? how cool is that?), I too wish I had thought to keep one of my own pieces back so it could be part of the final work, but ... who knows, maybe I'll get lucky and get one back in my returns!
Anyway, that's basically it - I had fun on this one even though at times it was tedious work (I managed to score a shoulder rubdown during the last night I was working on it - all bunched up I was!) and I REALLY look forward to seeing the returns and just how they're all gonna fit together.
Have a day, now!
~ gem ~
***UPDATE OCT 2007***
Here are the return cards I rec'd and how they look all put "back" together - pretty cool!


2 comments:
Gem!
Wow...
I can hardly find anything else to say.
You're obviously very talented, and Klimt is my favorite (my house is filles with prints of his works).
I'm going to keep checking in here, for sure!
Awe, thank you so much Carmel,
I appreciate your visit & kind words and am glad you want to stick around. And I've sent you a little something, so do be watching your mail!
~ gem ~
Post a Comment