on 2008? As in: How in The Hell is it already February!?
I seriously cannot deal if this is how fast the year is going to go by, and me having not remembered any of it passing. It just doesn't feel right, at all. An' I don' like it, nope!
BUT. I have managed to finish up a few things - I finally! mailed a long overdue care package to a fellow artfriend from Nness who needed cheering up ... My painted BG papers and rubberstamp images for a Yahoo group swap (that were due in Nov. Yeah, I'm a leeeetle behind shedju-uhl) are ready, but I still have to complete some decos that need to mail with them. Sigh.
I still owe a "PIF" from this very blog, that I said would be going out last month - not ready. I have a new series of zetti-inspired creepy eye collages that are totally stalled about a quarter way in since I've had no time to work on them. I need to do a major artroom cleanout, or I will never even find them - or anything else I need to work on. I owe my son a long-promised workday of listing some stuff on eBay, or at least a how-to lesson so he can do it himself. I have not taken and thusly, not uploaded, any new pics to Flick'r in soooo lonnng (and that makes me soooo sad) -and- I have three major family birthdays coming up at the end of the month - all within about a week of each other! plus I'm heading up the ice cream fundraiser at my youngest's school which puts me in the cafeteria every Friday during all lunches. (Yeah, WHAT was I thinking when I signed on for THAT? Answer: I clearly WASN'T.) eeeeeeeeeeeeeeeeeeeeeeeeeeeeeee.
In the good news column: I HAVE sold three prints of my collages: two on eBay, one on Etsy (my 1st ever Etsy sale, w00t!) - and intend to get some new ones listed really soon, the plan is to start focusing more on Etsy listings since eBay has disappointed me too often of late.
Thats enough updatey for this month - I meeeean, today ;)
See ya next time, and hopefully sooner rather than later!
~ gem ~
ETA: Almost forgot! My mom got me a Roomba for Christmas and while I used to look at them and smirk thinking "yeah, riiight" - Oh.My.God. if itsn't the best thing ever, I lovvvve it! It's been sweeping up my tile floors the whole time I've been working up this post. All hail ROOMBAAAAA! Shweeeeee!

a mixedmedia dabbler's artistic escapades
Showing posts with label Nervousness. Show all posts
Showing posts with label Nervousness. Show all posts
Monday, February 4, 2008
Wednesday, December 5, 2007
Dollhouse Deco
"Where oh where did November go,
oh wherrrre oh where can it beeee?"
Welcome to "the Season", I guess. sigh. This will probably end up my only post for December, so ... anyway! On to whatcha came for:
Here's the most recent deco booklet I had the great fortune to work in - made by the wonderfully talented Arrow for Pequad, and currently making the rounds over at Nervousness.org ... It's a beautifully crafted dollhouse themed deco and while I usually shy away from posting other people's work, I really wanted you to see the front cover of this deco (I did ask the maker for permission first, of course!):


It's got great layers of textured and patterned paper, and there's real eyelet curtains in the windows! How cool is that?! The front doors open to reveal two sets of blank pages, for the artists to work on, which are also house shaped. The recipient for this deco, Pequad, uses a Kewpie doll image alot in her work, and it's also her icon/mascot on the Nness site, so that was my starting point for my page idea: I was going to make a Victorian inspired house and somehow incorporate little "pequad" dolls (sidenote: I remember once she told a story about how she got her user name and it involved Kewpies and how her family calls them pequads - for some reason that I forget now. Anyway that always stuck with me and so whenever I see a Kewp I automatically think "pequad") I took a sheet of patterened scrapbook cardstock weight paper that I thought looked wallpaper-y, and aged it a bit with an acrylic paint wash, then did the same thing with some scraps to make floor dividers:

I printed some vintage images of household furniture and items in greyscale - and in an effort to be unique I decided I was going to make my page interactive, so! I made little pockets on some of the furniture pieces: The chaise, chair, cushion, bathtub and even the hatbox in the attic all have little pockets to tuck the dolls into. Actually the seat area of the chair was too small for a full usable pocket so it has a strip across the front that will hold the doll in place. I made the pockets by printing a double quantity of images and once I had cut the item out I then used the second matching image to cut the pocket section from, and glued it down to the full piece, making sure to leave space for my dollies to fit into! And that brings us to:

I wanted this deco page to be very personal to the recipient, so - I actually have in my possession an old vinyl Kewpie doll that I took pics of (I got it awhile back cause I planned to make something out of it, came in extra handy for some printed projects ... ) and I used those as my dolls. What you don't see here, because like a dolt I forGOT to take pictures of this! GRRR. - is that I made a backside image to the dolls as well, mmnhmmm, with their lil beehinds showin' - then I sandwiched them together with a length of ribbon in the middle that would later be attached to the page so you could put the dollies in the various pieces of furniture, but not lose the dolls. Cute, right?! I added wings that I painted with iridecent paint (yep, those have backs too), and then as a final touch I made each dolly a crown and a party hat - one to wear, one to keep up in the hat trunk in the attic.
Once I had all the pieces done, I glued the other end of the ribbons to the backside of the room page and added a top layer of text weight paper just to cover the ribbon ends - then glued the whole thing down to the blank page in the deco booklet. (Waiting in between steps for all the glues to dry & cure, of course!) I wanted this to be a special page and I feel really lucky that I got to start the deco off, so now all i hope is that she likes it and that all the little interactive bits hold up and work as I intended ... and I know it looks a little weird with the doll's feet disappearing into the chaise, but it was the best I could do! :D

Oh yeah! And after all that, know what's my favorite part of the deco? The last-minute addition of the framed family photo in the "Parlor" - it was originally going to be an old cross stitch sampler but luckily a more creative idea surfaced before I glued it down ...
Later, I got another project I gotta get back to, so maybe I'll have something new to post in a few days after all! Seeeeeeyuh!
~ gem ~
oh wherrrre oh where can it beeee?"
Welcome to "the Season", I guess. sigh. This will probably end up my only post for December, so ... anyway! On to whatcha came for:
Here's the most recent deco booklet I had the great fortune to work in - made by the wonderfully talented Arrow for Pequad, and currently making the rounds over at Nervousness.org ... It's a beautifully crafted dollhouse themed deco and while I usually shy away from posting other people's work, I really wanted you to see the front cover of this deco (I did ask the maker for permission first, of course!):
It's got great layers of textured and patterned paper, and there's real eyelet curtains in the windows! How cool is that?! The front doors open to reveal two sets of blank pages, for the artists to work on, which are also house shaped. The recipient for this deco, Pequad, uses a Kewpie doll image alot in her work, and it's also her icon/mascot on the Nness site, so that was my starting point for my page idea: I was going to make a Victorian inspired house and somehow incorporate little "pequad" dolls (sidenote: I remember once she told a story about how she got her user name and it involved Kewpies and how her family calls them pequads - for some reason that I forget now. Anyway that always stuck with me and so whenever I see a Kewp I automatically think "pequad") I took a sheet of patterened scrapbook cardstock weight paper that I thought looked wallpaper-y, and aged it a bit with an acrylic paint wash, then did the same thing with some scraps to make floor dividers:
I printed some vintage images of household furniture and items in greyscale - and in an effort to be unique I decided I was going to make my page interactive, so! I made little pockets on some of the furniture pieces: The chaise, chair, cushion, bathtub and even the hatbox in the attic all have little pockets to tuck the dolls into. Actually the seat area of the chair was too small for a full usable pocket so it has a strip across the front that will hold the doll in place. I made the pockets by printing a double quantity of images and once I had cut the item out I then used the second matching image to cut the pocket section from, and glued it down to the full piece, making sure to leave space for my dollies to fit into! And that brings us to:
I wanted this deco page to be very personal to the recipient, so - I actually have in my possession an old vinyl Kewpie doll that I took pics of (I got it awhile back cause I planned to make something out of it, came in extra handy for some printed projects ... ) and I used those as my dolls. What you don't see here, because like a dolt I forGOT to take pictures of this! GRRR. - is that I made a backside image to the dolls as well, mmnhmmm, with their lil beehinds showin' - then I sandwiched them together with a length of ribbon in the middle that would later be attached to the page so you could put the dollies in the various pieces of furniture, but not lose the dolls. Cute, right?! I added wings that I painted with iridecent paint (yep, those have backs too), and then as a final touch I made each dolly a crown and a party hat - one to wear, one to keep up in the hat trunk in the attic.
Once I had all the pieces done, I glued the other end of the ribbons to the backside of the room page and added a top layer of text weight paper just to cover the ribbon ends - then glued the whole thing down to the blank page in the deco booklet. (Waiting in between steps for all the glues to dry & cure, of course!) I wanted this to be a special page and I feel really lucky that I got to start the deco off, so now all i hope is that she likes it and that all the little interactive bits hold up and work as I intended ... and I know it looks a little weird with the doll's feet disappearing into the chaise, but it was the best I could do! :D
Oh yeah! And after all that, know what's my favorite part of the deco? The last-minute addition of the framed family photo in the "Parlor" - it was originally going to be an old cross stitch sampler but luckily a more creative idea surfaced before I glued it down ...
Later, I got another project I gotta get back to, so maybe I'll have something new to post in a few days after all! Seeeeeeyuh!
~ gem ~
Tuesday, September 18, 2007
Klimt ATC Project
As promised, here is the process breakdown of the ATC project I just finished for a swap at Nervousness.org: "Klimt; 9 Easy Pieces II" ... The hostess provided the players with a downloadable background page divided into 9 ATCs, and watermarked with a major portion of the Gustav Klimt painting "Tree of Life". Players were to interpret it however they saw fit, with the end goal being an entirely new "whole" artwork once all the pieces were swapped and we reassembled our returns. I know not everyone went the same route, but I decided to keep as close to the original as possible as far as shape and overall design. I worked off an image of the original painting from a book I have here at home, Klimt: Life & Work by Susanna Partsch.

I started by printing the downloaded BG onto plain white cardstock (took a few tries to get it sized exactly right) and used a regular old yellow marker to trace the outlines of the tree and branches. I kind of reversed the tree and background colors from the original painting (Klimt's tree is a darker golden brown and the BG is a creamier pale gold/tan, also the ground is a dark brown in his and I used red.) for no other reason than I needed to see the tree form and the details while working, but also wanted it to be easily blended away into the finished piece. I then cut it apart into 9 seperate ATCs and moved on to my next step: Torn tissue paper collage. I used yellow, light orange, red and some aqua tissue paper for this and just randomly tore bits and glued them down with some gel meduim - I wasn't even really following the original painting at this point but just filling in and adding depth and texture. The red paper was very opaque and didn't bleed like I expected it would so I limited how much of it I used.
STEP 1:

After I papered as much as I wanted (I didn't bother with the skinniest tendrils of the branches, just left them marker-yellow for now since I'd be painting it later.) I moved on to painting in the background, using a mix of acrylic paints (I like to use regular ol' craft paints) in assorted browns with some antique white and metallic gold. I did the same thing with the tree and branches using yellows and golds.
STEP 2:

The next part of the process was the longest and most tedious (though that tissue paper section got on my nerves after awhile, too) - the addition of all the little details on the tree and ground. I did a mix of collage and painting here, but mostly collage, using random papers out of my scrap box. EVERY PIECE was handcut, except for some of the stars and circles - they were punched. Though one of my circle punches wasn't sharp so I had to trim the edges anyway -eyeroll-. My original idea was to use an assortment of magazine cutout eyeballs for all the tree accents, but in the end I used those only on the little mushroomy lookin' dudes. I mostly followed the watermarkings and the image from the book, though I did add or change just a couple things. A few dabs here and there of paint to finish off some of the details and to meld other places together, and I was done with the bulk of the piece. All that was left to do was add in some highlighting on the background (mixture of whites and light gold paints) and then I outlined the major sections of the tree and ground with a white gelpen.
FINISHED PIECE:

I tissue paper collaged the reverse and added an info backplate, then scanned'em and packed 'em up for shipping. Like another participant mentioned on her Flick'r page (I know! check hers out, right? how cool is that?), I too wish I had thought to keep one of my own pieces back so it could be part of the final work, but ... who knows, maybe I'll get lucky and get one back in my returns!
Anyway, that's basically it - I had fun on this one even though at times it was tedious work (I managed to score a shoulder rubdown during the last night I was working on it - all bunched up I was!) and I REALLY look forward to seeing the returns and just how they're all gonna fit together.
Have a day, now!
~ gem ~
***UPDATE OCT 2007***
Here are the return cards I rec'd and how they look all put "back" together - pretty cool!

I started by printing the downloaded BG onto plain white cardstock (took a few tries to get it sized exactly right) and used a regular old yellow marker to trace the outlines of the tree and branches. I kind of reversed the tree and background colors from the original painting (Klimt's tree is a darker golden brown and the BG is a creamier pale gold/tan, also the ground is a dark brown in his and I used red.) for no other reason than I needed to see the tree form and the details while working, but also wanted it to be easily blended away into the finished piece. I then cut it apart into 9 seperate ATCs and moved on to my next step: Torn tissue paper collage. I used yellow, light orange, red and some aqua tissue paper for this and just randomly tore bits and glued them down with some gel meduim - I wasn't even really following the original painting at this point but just filling in and adding depth and texture. The red paper was very opaque and didn't bleed like I expected it would so I limited how much of it I used.
STEP 1:
After I papered as much as I wanted (I didn't bother with the skinniest tendrils of the branches, just left them marker-yellow for now since I'd be painting it later.) I moved on to painting in the background, using a mix of acrylic paints (I like to use regular ol' craft paints) in assorted browns with some antique white and metallic gold. I did the same thing with the tree and branches using yellows and golds.
STEP 2:
The next part of the process was the longest and most tedious (though that tissue paper section got on my nerves after awhile, too) - the addition of all the little details on the tree and ground. I did a mix of collage and painting here, but mostly collage, using random papers out of my scrap box. EVERY PIECE was handcut, except for some of the stars and circles - they were punched. Though one of my circle punches wasn't sharp so I had to trim the edges anyway -eyeroll-. My original idea was to use an assortment of magazine cutout eyeballs for all the tree accents, but in the end I used those only on the little mushroomy lookin' dudes. I mostly followed the watermarkings and the image from the book, though I did add or change just a couple things. A few dabs here and there of paint to finish off some of the details and to meld other places together, and I was done with the bulk of the piece. All that was left to do was add in some highlighting on the background (mixture of whites and light gold paints) and then I outlined the major sections of the tree and ground with a white gelpen.
FINISHED PIECE:
I tissue paper collaged the reverse and added an info backplate, then scanned'em and packed 'em up for shipping. Like another participant mentioned on her Flick'r page (I know! check hers out, right? how cool is that?), I too wish I had thought to keep one of my own pieces back so it could be part of the final work, but ... who knows, maybe I'll get lucky and get one back in my returns!
Anyway, that's basically it - I had fun on this one even though at times it was tedious work (I managed to score a shoulder rubdown during the last night I was working on it - all bunched up I was!) and I REALLY look forward to seeing the returns and just how they're all gonna fit together.
Have a day, now!
~ gem ~
***UPDATE OCT 2007***
Here are the return cards I rec'd and how they look all put "back" together - pretty cool!
Tuesday, July 31, 2007
Alice and Sara
This turned into a knock-it-out-this-afternoon project for two reasons: One, I was waiting to find out if I am required to show up for jury duty tomorrow (and possibly longer) so I wasn't sure I'd have any spare time later in the week to work it - and 2 - it started storming pretty bad which meant shutting down and unplugging all the electronics (including computer and TV) so I figured I may as well sit down and do this! even though I kinda wasn't in the mood ...
Another mailart project for Nervousness: a pair of ATC pocket decos that are traveling together, you make an ATC and slip it in the pocket, in the end the recip's would get back an adorable booklet with 4 ATC's inside. Mine was the last spot, so these will be heading home when I'm done, and I didn't want to keep them any longer than I really had to.
First off, the decos themselves were so neat! Really delicious pale colored & patterned cardstock that was sewn into a little 4 pocket booklet that tied shut with thin ribbon. The ATC blanks were already included (matched the deco paper!) and while I originally planned to do something completely different, once I saw the blank and the previous artists' cards (that were all very pretty and vintage-y and matched the colors of the deco) I knew I was gonna go ahead and keep to the same theme so it had a nice cohesive look.


I started off by stamping a decorative design onto the front of my blanks (I chose to use the harlequin printed side) with a foam stamp and sand colored ink. Then I added texture by lightly spattering with two colors (antique white and victorian green) of acrylic paint. I chose two ladies from a page of printed vintage images in my stash and tore a random page out of an old paperback for some text. Turned out it had two different girls' names -score!- so I tore off thin strips and painted over all the text but the names, then arranged them onto the cardback and glued them down. Looking at them afterward I feel I should have anchored the girls' images somehow, but ... didn't! and can't now. Added a row of paint dots down the side and edged the cards with the sand ink - signed the backs (which were striped and perfect as text lines) and they are enveloped and addressed and as soon as I stamp them they'll be set to head out in tomorrow's mail ... which is a good thing ...
'cause I DID end up pulling jury duty. GRR.
Judicially yours,
~ gem ~
Another mailart project for Nervousness: a pair of ATC pocket decos that are traveling together, you make an ATC and slip it in the pocket, in the end the recip's would get back an adorable booklet with 4 ATC's inside. Mine was the last spot, so these will be heading home when I'm done, and I didn't want to keep them any longer than I really had to.
First off, the decos themselves were so neat! Really delicious pale colored & patterned cardstock that was sewn into a little 4 pocket booklet that tied shut with thin ribbon. The ATC blanks were already included (matched the deco paper!) and while I originally planned to do something completely different, once I saw the blank and the previous artists' cards (that were all very pretty and vintage-y and matched the colors of the deco) I knew I was gonna go ahead and keep to the same theme so it had a nice cohesive look.
I started off by stamping a decorative design onto the front of my blanks (I chose to use the harlequin printed side) with a foam stamp and sand colored ink. Then I added texture by lightly spattering with two colors (antique white and victorian green) of acrylic paint. I chose two ladies from a page of printed vintage images in my stash and tore a random page out of an old paperback for some text. Turned out it had two different girls' names -score!- so I tore off thin strips and painted over all the text but the names, then arranged them onto the cardback and glued them down. Looking at them afterward I feel I should have anchored the girls' images somehow, but ... didn't! and can't now. Added a row of paint dots down the side and edged the cards with the sand ink - signed the backs (which were striped and perfect as text lines) and they are enveloped and addressed and as soon as I stamp them they'll be set to head out in tomorrow's mail ... which is a good thing ...
'cause I DID end up pulling jury duty. GRR.
Judicially yours,
~ gem ~
Sunday, July 29, 2007
Altered Art Folder
This is a Very Long Overdue PIF gift for a gal at Nervousness. She graciously sent me nice batch of clear wax crayons at Easter-time (I use them as resists, mostly in background-making) and I promised I'd make something for her in return. And here it is kneedeep in summer and I've only just gotten myself together and finished this up.


I got the idea from a how-to posting at Lisa Vollrath's site Go Make Something (you will need to register to view most of the stuff there, but it is free and SO worth it) I have a box FULL of old AOL CDs - ones in folders, tins, etc - so I had no problem getting my supplies together: AOL folder (I tossed the disc, as I wasn't going to alter it as part of my project), cardstock - I used a plain beigey brown, inks including Ranger's Distress Ink in Walnut Stain, and a handful of my favorite rubberstamps.

First I seperated apart the AOL folder and traced onto my cardstock as shown on Lisa's site, and cut out the pieces, gluing the two sides together (but leaving the flap part open for now) Then I applied a light colored (sand) ink pad directly to the cardstock to swipe some color lightly all over, on both sides. Then I used the same color to rubberstamp my images in a random, collage-y fashion, until all areas were covered. I used the darker distress ink to stamp some accents inside the section where the pocket would be, along the back edge, and I stamped a frame type image and some text onto a scrap of the cardstock to make a title embellishment, which I glued on to the front cover. At this point I used the darker brown and distress inks to ink all the edges of the folder (make sure you fold it up and check all the sides!) Then I glued the inside flap over to create the pocket, and after it was dry I stuffed it with some handmade ATC envelopes and a couple other goodies - all soon to be on their way to beehive in New York.
It was a fun way to both try a new technique and fulfill an ART-trade obligation!
Now go sign up to that site and, as Lisa says: Go Make Something ...
I'm getting ready to Go Out to Dinner, myself - so see ya later!
~ gem ~
Thursday, July 26, 2007
Pink & Brown Deco, Redux
This poor, poor little deco. So here's the 3rd remake of this themed deco that's currently going around Nervousness and is TRYing to get home to her owner! - The original was accidentally ruined (involved a toddler and a shower - never a good combo, yeah?) so that artist replaced it with a realllly nicely done design and was the one I worked my "Garden Party" page in. I then mailed it off to next player 'round the end of May and it still has not arrived. (Florida to Pennsylvania. Not exactly a haul.) Since it was lost on my watch I offered to make a NEW replacement, and this is what I came up with:

I'm not super thrilled with my deco-making of late, which is why I am on a self-imposed break from making & decorating - other than the ones I already have lined up. This one however was an emergency makeup deco, so therefore doesn't count. :D It's made with scrapbooking paper covers, 2 shades of pink cardstock for interior pages, sorta "postbound" style with brads, and a rubberstamped image on the front (which, is upside down.) for the title text which is P & B in letter stickers.
~ gem ~
Sunday, July 8, 2007
idiosyncraticATC
:::idiosyncratic ATC unison:::
Okay, this was a semi-fun, mostly difficult ATC project put on by blueness over at Nervousess.org ... I've never done one of these "supply packet" projects before and I felt like a challenge (plus they had one last spot open, PLUS the hostess and I share the same birthday, weeee!) So yeah, let's do it!
Here's the basics: Hostess sends an envelope full of arty scrappy supplies (roughly the same pieces to each player) including the back/blank - which you then use to create an ATC. The rules are - you MUST somehow incorporate a part of each different item supplied. And ONLY those items. No outside papers, paints, accents, pens - NOTHING. Only tools may be used such as glue, scissors, paintbrush and so on. Sounds fun and easy right? HAH! until you see the amount of stuff stuffed into that envelope and realize you now have to design and assemble an actual piece of art using ALL these things, none of which were of your choosing. Teabag? Match? Excuse me?
:::the supplies:::

1 random dictionary page (I got bf - Biedermeier)
2 page from vintage stamp collectors price guide
3 half sheet of printed vintage images
4 various tissue, mulberry, paper scraps - 5 pcs
5 Queen of Spades playing card
6 rectangle of cardstock w/pinked edges
7 used (public transport?) access swipecard
8 teabag, match, scrap of foil-tape, film negative
9 scrap of mylar type paper (silver on one side, black on the other)
10 postage stamp, piece of flower stem?, 2 bits of novelty yarn
11 baggies of: embossing powder (pink) and acrlyic paints - the silver was fine, the gold was dried
~ plus there was the project note and the card image to be used as ATC backing
And here's what I did with all that:
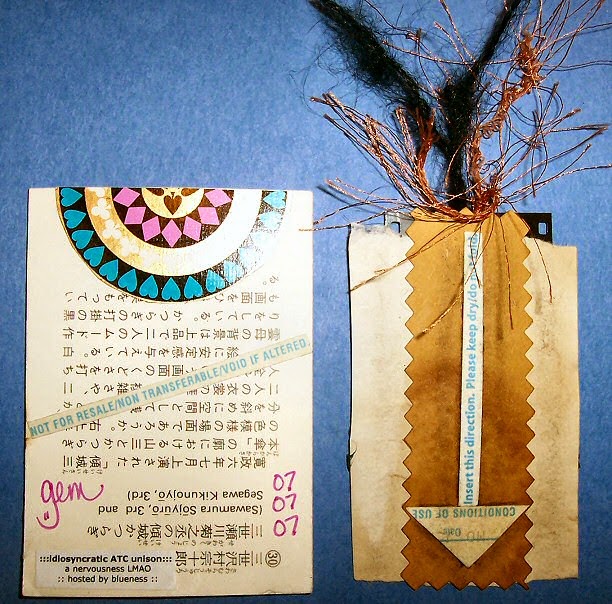
First I distressed the original card image with a sanding block - I really wanted to keep as much of the original image as possible, just toned down - then used the teabag to teastain all the papers except the cardback, playing card, swipecard and mylar paper. I painted the edges of the postage stamp with the silver paint and adhered the embossing powder to it (now, I don't emboss so I tried using an iron to "melt" it - it didn't look any different than if I'd glued it, so ... hope it holds!) I cut stars and a half circle out of the foiltape and dried gold paint with a paperpunch, and attached these to the filmstrip piece. I tore and layered some tissue & mulberry paper onto a pocket I'd cut from half the teabag, and added a band of the mylar paper to the top, then glued that whole piece to the bottom of the ATC ... I added the postage stamp, the flower stem, a hand cut from the playing card and a couple more star cutouts to the card, as well as bits of text from the dictionary page and one of the vintage image pages. For the record: I'm kinda ticked about the direction HRH's head is facing and I LOATHE the embossing powder but -eh-- whatever. Front of card is finished.

For the second part of my pocket ATC, I took the already teastained bit of plain paper and tore the ends to fit, then layered the other bit of mulberry paper, a small scrap of cardstock (which was left intact & completely as-sent other than I teastained it) plus an image from the stamp guide page - added the filmstrip section to the top and tied the two yarn bits through the holes on that. Flipped it over and added the pinked cardstock (again - altered only with teastaining) to which I glued a fun bit of instruction cut from the swipecard, which reads: "Conditions of Use - Insert this direction. Please keep dry/do not fold." Then I added another section from the playing card to the back of the ATC as well as my FAVORITE text section (the one I knew I'd use right from the start) a bit from the swipecard that read "Not For Resale/Non Transferrable/Void If Altered" and signed & dated it ~ gem 07-07-07 ~ VOI and LA! we are finished! Hooray!

ohhhhhh yeahhhhh ... what ABOUT that MATCH?
Well my original plan was to complete the card then strike the match and sorta burn the edges to give it a real old "I've survived some shit" feel ... but the match burned SO FAST and the card just wouldn't take (you can so barely see any singeing right at the edge on the back where it reads "Not" ) that I ended up just using the burnt matchhead like charcoal, and edged parts of the pocket tag. I smudged it in though, so it's pretty much only visible in person, sorry!
Only things I used other than what was supplied: PPA glue, gluestick, shaped paperpunch, scissors, sanding block. *And a lighter to light the match - that might be cheating, I dunno - but I don't have matchbooks here and tried to strike it on a bunch of other surfaces first, none of which worked, so I hadda improvise.
Anyway I'm not thrilled with this one as a whole, though I do like some of the parts - mostly the tag and the back of the ATC, but I did REALLY enjoy the process and the creative stretch I got -- and am totally looking forward to seeing the other submissions!


~ gem ~
Okay, this was a semi-fun, mostly difficult ATC project put on by blueness over at Nervousess.org ... I've never done one of these "supply packet" projects before and I felt like a challenge (plus they had one last spot open, PLUS the hostess and I share the same birthday, weeee!) So yeah, let's do it!
Here's the basics: Hostess sends an envelope full of arty scrappy supplies (roughly the same pieces to each player) including the back/blank - which you then use to create an ATC. The rules are - you MUST somehow incorporate a part of each different item supplied. And ONLY those items. No outside papers, paints, accents, pens - NOTHING. Only tools may be used such as glue, scissors, paintbrush and so on. Sounds fun and easy right? HAH! until you see the amount of stuff stuffed into that envelope and realize you now have to design and assemble an actual piece of art using ALL these things, none of which were of your choosing. Teabag? Match? Excuse me?
:::the supplies:::
1 random dictionary page (I got bf - Biedermeier)
2 page from vintage stamp collectors price guide
3 half sheet of printed vintage images
4 various tissue, mulberry, paper scraps - 5 pcs
5 Queen of Spades playing card
6 rectangle of cardstock w/pinked edges
7 used (public transport?) access swipecard
8 teabag, match, scrap of foil-tape, film negative
9 scrap of mylar type paper (silver on one side, black on the other)
10 postage stamp, piece of flower stem?, 2 bits of novelty yarn
11 baggies of: embossing powder (pink) and acrlyic paints - the silver was fine, the gold was dried
~ plus there was the project note and the card image to be used as ATC backing
And here's what I did with all that:
First I distressed the original card image with a sanding block - I really wanted to keep as much of the original image as possible, just toned down - then used the teabag to teastain all the papers except the cardback, playing card, swipecard and mylar paper. I painted the edges of the postage stamp with the silver paint and adhered the embossing powder to it (now, I don't emboss so I tried using an iron to "melt" it - it didn't look any different than if I'd glued it, so ... hope it holds!) I cut stars and a half circle out of the foiltape and dried gold paint with a paperpunch, and attached these to the filmstrip piece. I tore and layered some tissue & mulberry paper onto a pocket I'd cut from half the teabag, and added a band of the mylar paper to the top, then glued that whole piece to the bottom of the ATC ... I added the postage stamp, the flower stem, a hand cut from the playing card and a couple more star cutouts to the card, as well as bits of text from the dictionary page and one of the vintage image pages. For the record: I'm kinda ticked about the direction HRH's head is facing and I LOATHE the embossing powder but -eh-- whatever. Front of card is finished.
For the second part of my pocket ATC, I took the already teastained bit of plain paper and tore the ends to fit, then layered the other bit of mulberry paper, a small scrap of cardstock (which was left intact & completely as-sent other than I teastained it) plus an image from the stamp guide page - added the filmstrip section to the top and tied the two yarn bits through the holes on that. Flipped it over and added the pinked cardstock (again - altered only with teastaining) to which I glued a fun bit of instruction cut from the swipecard, which reads: "Conditions of Use - Insert this direction. Please keep dry/do not fold." Then I added another section from the playing card to the back of the ATC as well as my FAVORITE text section (the one I knew I'd use right from the start) a bit from the swipecard that read "Not For Resale/Non Transferrable/Void If Altered" and signed & dated it ~ gem 07-07-07 ~ VOI and LA! we are finished! Hooray!
ohhhhhh yeahhhhh ... what ABOUT that MATCH?
Well my original plan was to complete the card then strike the match and sorta burn the edges to give it a real old "I've survived some shit" feel ... but the match burned SO FAST and the card just wouldn't take (you can so barely see any singeing right at the edge on the back where it reads "Not" ) that I ended up just using the burnt matchhead like charcoal, and edged parts of the pocket tag. I smudged it in though, so it's pretty much only visible in person, sorry!
Only things I used other than what was supplied: PPA glue, gluestick, shaped paperpunch, scissors, sanding block. *And a lighter to light the match - that might be cheating, I dunno - but I don't have matchbooks here and tried to strike it on a bunch of other surfaces first, none of which worked, so I hadda improvise.
Anyway I'm not thrilled with this one as a whole, though I do like some of the parts - mostly the tag and the back of the ATC, but I did REALLY enjoy the process and the creative stretch I got -- and am totally looking forward to seeing the other submissions!
~ gem ~
Friday, June 29, 2007
Mermen, Merfolk!
Recently I was in the process of making a little Mermen themed deco for an Nness friend when I came across a want in the Deco PIF (Pay-It-Forward) thread for a Merfolk themed deco ... since I was already doing one, I thought - why not another?
The original idea came about when I was making some new handpainted background papers one day and really liked the aqua-y blue green pages I turned out, they seemed just right for a mystical sea creature project ... didn't wanna make yet another Mermaid themed booklet, so I decided to make a Mermen one instead!

Mermen deco ~ handpainted cover papers with metallic watercolor paints, collaged merman -vintage cartoon image of a king or some royal type figure, with real life fish bodyparts from a magazine, coating of hologram glitter paint for shimmery scales effect- Art Deco style letter stickers for cover text


Merfolk deco ~ this scan is of the interior cover page and front of artists blank pages ... Same metallic watercolor painted background papers for the covers, same method of collage for the "merfolk" as above ... I added divider pages made from discarded map papers (tried to go with ones that had mostly water area showing) in between the blank artists pages, and added a different merfolk figure onto each of the map pages ... The front "Artists Welcome" map page I made by typing text onto a transparency sheet, overlaid on a scrap of the cover paper and attached with small brads, then that whole piece was glued down. In my desire to add an artistic element to the dedication page inside the front cover, I glued down small transparent & iridescent star confetti all around the edge - I used jewel glue and weighted it down to press flat & adhere while it dried, but I noticed after scanning that a couple had popped off anyway. I reattached them and covered the whole page with acrylic sealer (which made the gel pen bleed some, dargghh.) and I don't know if that will be enough to keep them on but lets XfingersX that it does! would really be disappointed to find out it arrived all ... de-starred.
I liked that they were both a bit different take on the typical "mermaid" theme, and I hope the recips like the decos they got from me and they come home filled with really fun, unique bits of art ... I think this is going to be it for me for deco making just now ... I have a few more to work some pages in as soon as they come in, and a BUNCH that need to be sent back off into the world to be worked in by others as soon as I figure out who I should send them to ... but me, myself - I'm really deco'd out these days and think I'm gonna be doing more ATCs and getting into that sewing machine ...
Seeya!
~ gem ~
The original idea came about when I was making some new handpainted background papers one day and really liked the aqua-y blue green pages I turned out, they seemed just right for a mystical sea creature project ... didn't wanna make yet another Mermaid themed booklet, so I decided to make a Mermen one instead!
Mermen deco ~ handpainted cover papers with metallic watercolor paints, collaged merman -vintage cartoon image of a king or some royal type figure, with real life fish bodyparts from a magazine, coating of hologram glitter paint for shimmery scales effect- Art Deco style letter stickers for cover text
Merfolk deco ~ this scan is of the interior cover page and front of artists blank pages ... Same metallic watercolor painted background papers for the covers, same method of collage for the "merfolk" as above ... I added divider pages made from discarded map papers (tried to go with ones that had mostly water area showing) in between the blank artists pages, and added a different merfolk figure onto each of the map pages ... The front "Artists Welcome" map page I made by typing text onto a transparency sheet, overlaid on a scrap of the cover paper and attached with small brads, then that whole piece was glued down. In my desire to add an artistic element to the dedication page inside the front cover, I glued down small transparent & iridescent star confetti all around the edge - I used jewel glue and weighted it down to press flat & adhere while it dried, but I noticed after scanning that a couple had popped off anyway. I reattached them and covered the whole page with acrylic sealer (which made the gel pen bleed some, dargghh.) and I don't know if that will be enough to keep them on but lets XfingersX that it does! would really be disappointed to find out it arrived all ... de-starred.
I liked that they were both a bit different take on the typical "mermaid" theme, and I hope the recips like the decos they got from me and they come home filled with really fun, unique bits of art ... I think this is going to be it for me for deco making just now ... I have a few more to work some pages in as soon as they come in, and a BUNCH that need to be sent back off into the world to be worked in by others as soon as I figure out who I should send them to ... but me, myself - I'm really deco'd out these days and think I'm gonna be doing more ATCs and getting into that sewing machine ...
Seeya!
~ gem ~
Monday, June 18, 2007
Art Journal Letter
So, sadly - one of the players in the Artist's Bakers Dozen swap at Nervousness got flaked on - I offered to send a new package on to her and that entailed creating another personal letter in art journal style. Here is the finished product and the original blank BG I made (I posted the background layout on Flick'r prior to adding my text ...)


- be sure to view full size -
Basic watercolor wash on sketchpad paper ... stamped on with some random foam and rubber stamp flower images (this was a fairly old BG paper I dug out of my stash, I wanted a lightweight paper as opposed to my usual textured watercolor paper) then I added some images - magazine clipping and vintage bird drawings printed on the computer, with a little acrylic paint wash added around those - the textlines and accent outlines in white gel pen, and finally my journal text in fineline Sharpie. I took my content cue from the imagery I'd created, and related a quick little (multi)bird story from my own life. I tend to be short and sweet with any of my journalish projects, so even though this was technically supposed to be a full-on "letter" (and I could have rambled on a few more bird things but ran outta writing space on this one) - overall I'm calling it a success.
Oh and I haven't gotten a chance to sit'n sew yet ... soon, I hope!
~ gem ~
Wednesday, May 30, 2007
Deco Diatribe

This is my page in a housewarming deco for a Nness'r who moved recently (or - recently when it was started, anyway) It's about 4x4 and super cute - I love the artwork done for the covers! When I signed up I immediately came up with an idea to make a mini piece of art to hang on a wall and include the text "Home is where the Heart Is" with an emphasis on the "ART" part of heart ... So when it arrived here's what I did:
I made a tiny piece of abstract art on watercolor paper -gel pens this time -> hah! NOT Sharpies like ya thought!- and cut out a little frame ... The background image is actually a photo of the recip's own home, I snagged it from her blog ...hope that doesn't come off as really weird once she see's it!... the "string" on the art is from a wallhanging that was already on the wall there in the photo.
Okay, now theres two things I'm ticked about with this one (what?! only two?! harhar.): I wish I'd NOT added the white colored in areas to the lettering - at the time it seemed like ti needed something cause it just wasn't standing out - but afterwards it just looked ... messy. And while originally I thought I was balancing the text better by laying it out that way - NOW I know I should have left the "ART" part standalone on that section of wall above the artwork. Hold your finger over the word 'where' in the pic and you'll see what I mean. I HATE when the better ideas come AFTER the work is done - RAAAR! **And yes, I did consider reprinting a new BG picture and removing the art and redoing it, but it was 2AM and the glue was holding (for once, of course) and I was afraid of ruining the entire thing. So OH Well.
Friday, May 4, 2007
Journal Style Letter
So, I'm in this swap at Nervousness right now and one of the items we're to send our partner is a personal letter in journal style. I don't really like to write so I kinda agonized over this and waited til the last minute to finish it, but here it is:

The paper is handpainted with my standard BG technique (see previous posting) and then collaged just a bit with some magazine and computer printed images, plus some vinyl stickers - lines were added with an acrylic paint wash. The writing was done in Sharpie (after many attempts with PITT pens, Flairs, ZIGs) - the Sharpie just let me work alot faster, and it didn't turn out TOO bad, even with my horrible hodgepodge mess of handwriting (I've always envied those journal'ers who had font-perfect writing!) Accents were added with my new favorite! White Gel Pen - and I colored in some of the letters (which I wasn't crazy about afterwards, but -eh- I can nitpick anything I've made to death so may as well just stop now). Anyway it's done, it's true to what I was feeling when I wrote it, and hopefully will speak to the recipient in some way.
Now I gotta jet - summertime is upon us and the end of the school year is SO busy I can barely keep up ... just gotta tough it out a couple more weeks then sweeet sweeet summer ... ahhhh. Love it!
~ gem ~
Subscribe to:
Posts (Atom)