
Okay, this was a semi-fun, mostly difficult ATC project put on by blueness over at Nervousess.org ... I've never done one of these "supply packet" projects before and I felt like a challenge (plus they had one last spot open, PLUS the hostess and I share the same birthday, weeee!) So yeah, let's do it!
Here's the basics: Hostess sends an envelope full of arty scrappy supplies (roughly the same pieces to each player) including the back/blank - which you then use to create an ATC. The rules are - you MUST somehow incorporate a part of each different item supplied. And ONLY those items. No outside papers, paints, accents, pens - NOTHING. Only tools may be used such as glue, scissors, paintbrush and so on. Sounds fun and easy right? HAH! until you see the amount of stuff stuffed into that envelope and realize you now have to design and assemble an actual piece of art using ALL these things, none of which were of your choosing. Teabag? Match? Excuse me?
:::the supplies:::

1 random dictionary page (I got bf - Biedermeier)
2 page from vintage stamp collectors price guide
3 half sheet of printed vintage images
4 various tissue, mulberry, paper scraps - 5 pcs
5 Queen of Spades playing card
6 rectangle of cardstock w/pinked edges
7 used (public transport?) access swipecard
8 teabag, match, scrap of foil-tape, film negative
9 scrap of mylar type paper (silver on one side, black on the other)
10 postage stamp, piece of flower stem?, 2 bits of novelty yarn
11 baggies of: embossing powder (pink) and acrlyic paints - the silver was fine, the gold was dried
~ plus there was the project note and the card image to be used as ATC backing
And here's what I did with all that:
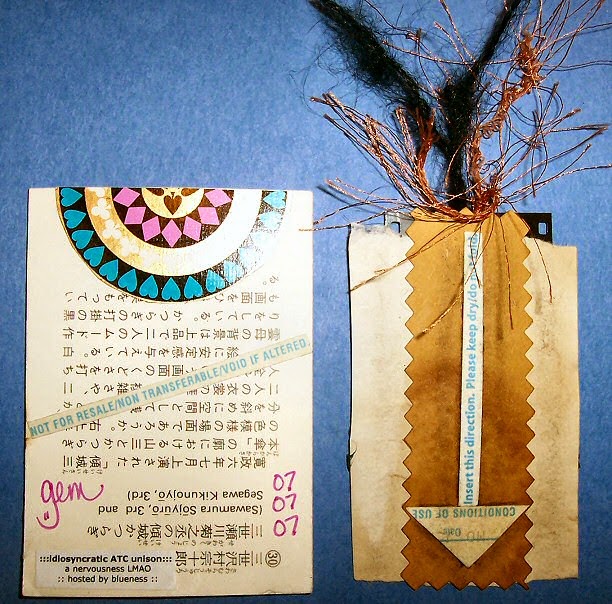
First I distressed the original card image with a sanding block - I really wanted to keep as much of the original image as possible, just toned down - then used the teabag to teastain all the papers except the cardback, playing card, swipecard and mylar paper. I painted the edges of the postage stamp with the silver paint and adhered the embossing powder to it (now, I don't emboss so I tried using an iron to "melt" it - it didn't look any different than if I'd glued it, so ... hope it holds!) I cut stars and a half circle out of the foiltape and dried gold paint with a paperpunch, and attached these to the filmstrip piece. I tore and layered some tissue & mulberry paper onto a pocket I'd cut from half the teabag, and added a band of the mylar paper to the top, then glued that whole piece to the bottom of the ATC ... I added the postage stamp, the flower stem, a hand cut from the playing card and a couple more star cutouts to the card, as well as bits of text from the dictionary page and one of the vintage image pages. For the record: I'm kinda ticked about the direction HRH's head is facing and I LOATHE the embossing powder but -eh-- whatever. Front of card is finished.

For the second part of my pocket ATC, I took the already teastained bit of plain paper and tore the ends to fit, then layered the other bit of mulberry paper, a small scrap of cardstock (which was left intact & completely as-sent other than I teastained it) plus an image from the stamp guide page - added the filmstrip section to the top and tied the two yarn bits through the holes on that. Flipped it over and added the pinked cardstock (again - altered only with teastaining) to which I glued a fun bit of instruction cut from the swipecard, which reads: "Conditions of Use - Insert this direction. Please keep dry/do not fold." Then I added another section from the playing card to the back of the ATC as well as my FAVORITE text section (the one I knew I'd use right from the start) a bit from the swipecard that read "Not For Resale/Non Transferrable/Void If Altered" and signed & dated it ~ gem 07-07-07 ~ VOI and LA! we are finished! Hooray!

ohhhhhh yeahhhhh ... what ABOUT that MATCH?
Well my original plan was to complete the card then strike the match and sorta burn the edges to give it a real old "I've survived some shit" feel ... but the match burned SO FAST and the card just wouldn't take (you can so barely see any singeing right at the edge on the back where it reads "Not" ) that I ended up just using the burnt matchhead like charcoal, and edged parts of the pocket tag. I smudged it in though, so it's pretty much only visible in person, sorry!
Only things I used other than what was supplied: PPA glue, gluestick, shaped paperpunch, scissors, sanding block. *And a lighter to light the match - that might be cheating, I dunno - but I don't have matchbooks here and tried to strike it on a bunch of other surfaces first, none of which worked, so I hadda improvise.
Anyway I'm not thrilled with this one as a whole, though I do like some of the parts - mostly the tag and the back of the ATC, but I did REALLY enjoy the process and the creative stretch I got -- and am totally looking forward to seeing the other submissions!


~ gem ~
1 comment:
Hey gem! Thanks so much for sharing what you did with this. It is wonderful. I think the whole point of projects like this is the process not the result. But I do like your result!! Great idea making the pocket. I ended up making a tryptich for mine but I didn't take any pics of it before sending it back. I, too, can't wait to see all the others.
Post a Comment