Friday, May 21, 2010

Yumbombs


Yumbombs
Originally uploaded by gemgirlart
Here's a super quick, super easy SUPER yummy food recipe. If you don't like this you might be an alien! (Vege-vegan friends, just add something in place of the meat! and you can still eat ...)


Went to my inlaws for a brunchy type visit and mum-in-law made these biscuity potato-y cheesy ham things and I was all "Slaaghhh!" (thats drool-laden foodie speak for - "Wow, these are delicious!") so the next night we decided to make them ourselves. Here's the recipe I found online that most closely matched them: Ham Potato Puffs - and I didn't follow the directions exactly - didn't measure any of the ingredients, didn't use the parsley or garlic powder, and the only biscuits I had were the "jumbo" kind - which made them a bit too bready, so - the next night we tried again, cause there in fact WAS leftover mashed potatoes from the 1st batch (imagine! leftover mashed potatoes! I know thats the whole point of the recipe, to use up leftover stuff, but still. I don't remember hardly evvver having leftover mashed potatoes. Unless it was like, the day after Thanksgiving or something) Anyway.

Day 2:
I used crescent roll dough in place of the buttermilk biscuits and added some cooked chopped bacon to the potato mixture. Still didn't measure anything, just dumped all the ham cheese & bacon into the mashed potatoes - ALSO! I added a pinch of salt & pepper this time - and than scooped spoonfuls into the muffin cups, in fact I made sure to fill'em real full, as ya can see from the picture. THESE were much better than the first batch - a bit tastier with the added salt, and definitely better with the smaller amount of bread outer shell. I would try next time with the smaller (regulr) size of buttermilk biscuits though. What I love is this is soooo easy and ya really don't have to fuss with measuring - just dump all yer stuff (I'm thinking you non meat eaters could add broccoli or any other chunky veg you like - I'd just cook it first before adding) into the potato mix, fill your pastry-lined muffin tins and 20-25 mins @ 350* you are eating some DEElish lil yummies. Both days we had ours with a mixed green salad & sliced tomatoes. I'm thinking they'd made nice appetizers in a smaller, minimuffin format too, yeah?

SO! Get with the mixing and enjoy what I now refer to as Cheesy Potato Bombs =D

xoxo
~ gem

Tuesday, April 6, 2010

Most Determined Deco, Ever.

So, once upon a time I played with a fun group af mailartists over at a site called Nervousness.org {heart} ~ I haven't been there in a really really long time, and as far as I know it's not nearly as active as it used to be, blahblahblah, etc and so on.

Anyway here's the story: A pink & brown themed deco was travelling around Nervousness to be filled with art and then sent back to it's owner (who was a friend of an Nness friend on another mailart site, or something) - the gal before me on the list had an accident with it - whereby her toddler daughter snatched it off the desk and brought it to her in the shower = utter ruination! SO. She makes an entirely NEW pink and brown deco to make amends, does up her page inside and sends if off to me. I make my page:


And mail it on May 29, 2007 from a postoffice here in Florida to my galpal Pequad in Pennsylvania. Pequad was so named for her love of Kewpie dolls, and I had added a supercute Pequad Fairy to the back of the envelope, and I was SO excited waiting for her to see it! Only ... she never saw it, cause a few weeks or so go by and we all start wondering: "Hey, where's the deco?" "Hmmm I dunno, I mailed it on x-date, it should be there by now!" "I haven't got it yet." "Oh, craps - guess it's lost."

So now I sit down to make yet a THIRD deco for this poor poor chica who probably is thinking my Lord what was my friend thinking sending my deco off to these nitwits?" and I'm all boohoo 'cause Pequd's never gonna get to admire my lil tribute to her, and I'm just sure there's an evil mailman holed up somewhere with stacks and stacks of our long-lost artwork surrounding him in his bunker of madness, plotting his revenge on mailartists worldwide.


New deco is made, sent yet again to Pequad (though I don't think I bothered with the envelope trappings this go-round) and it was rec'd just fine and last I heard/kept up with the updates on the original post it was in Australia. So I don't know if that one ever even made it to dear Denise, the intended recipient.

Cut to, today April 6, 2010 ~ I see the mail on the counter & there's a yellow bubble mailer, I'm not expecting anything (hmmm?!) so I check it out and first thing I see is a big Return to Sender sticker, marked "not deliverable as addressed - unable to forward" - flip it over and PEQUAD FAIRY! hellloooo! I definitely remembered the envelope, if not what was inside it. I was WAY surprised when I read the original postmark date:


and doubly surprised when I see the recent post office cancellation stamp of March 23, 2010 - from HONOLULU, HAWAII! How d'ya get off track from Florida to Pennsylvania by way of Hawaii!? And why does it take 3 years!? It's a bit wrinkly and some of the Sharpie writing on the front has bled, though the address is still perfectly readable (and as far as I know - valid - it's where I sent my makeup version) so I really have no idea why it was marked undeliverable - but everything was intact! It's a mailroom miricle!

So, now I'm thinking I'm just gonna send it on to Denise myself, and let her decide it's fate at this point, yeah?

x0x, gem

Saturday, April 3, 2010

Corkboard Project


Corkboard Project 5
Originally uploaded by gemgirlart
Hi Hello Howareya?!

And yes this is my first blog post of 2010, so Happy New Year as well!
(I'm so lame. and full of shame. and take the blame!)
Anyway I worked on this lil project last month and wanted to quickly share it with you ...

I had an inspiration board hanging over my sewing area - only it wasn'y very inspiring. Plain 'ol wooden framed, cheap mass market cork message board - nice size but corkboards always piss me off due to the fact theres hardly any cork on em! it's like a millimeter thick layer then ya hit particleboard - bah! altogether maddening. I also tried those "cork only" squares that supposedly you can attach right to the wall with doublestick tape? Uh, no. ya can't. I hate that stuff, anyhow, but it was a nice thicker piece of cork, SO! one day I decided 'Hay! Why don't you combine the two?" - and here is what I did:


1) Since the original board was rectangular and the cork squares were, well - square - I had to cut them to fit. Ruler & craft / utility knife were a must!


2) Since I'd be cutting and attaching the cork squares to the wooden framed board and there'd be a buncha ugly seams leftover, I decided I'd also go ahead and cover it with fabric and edge it with ribbon, too. This would also make it way easier to reattach my button collection to the outer edges of the board (through the fabric ribbon instedda into the cork - brilliant!)

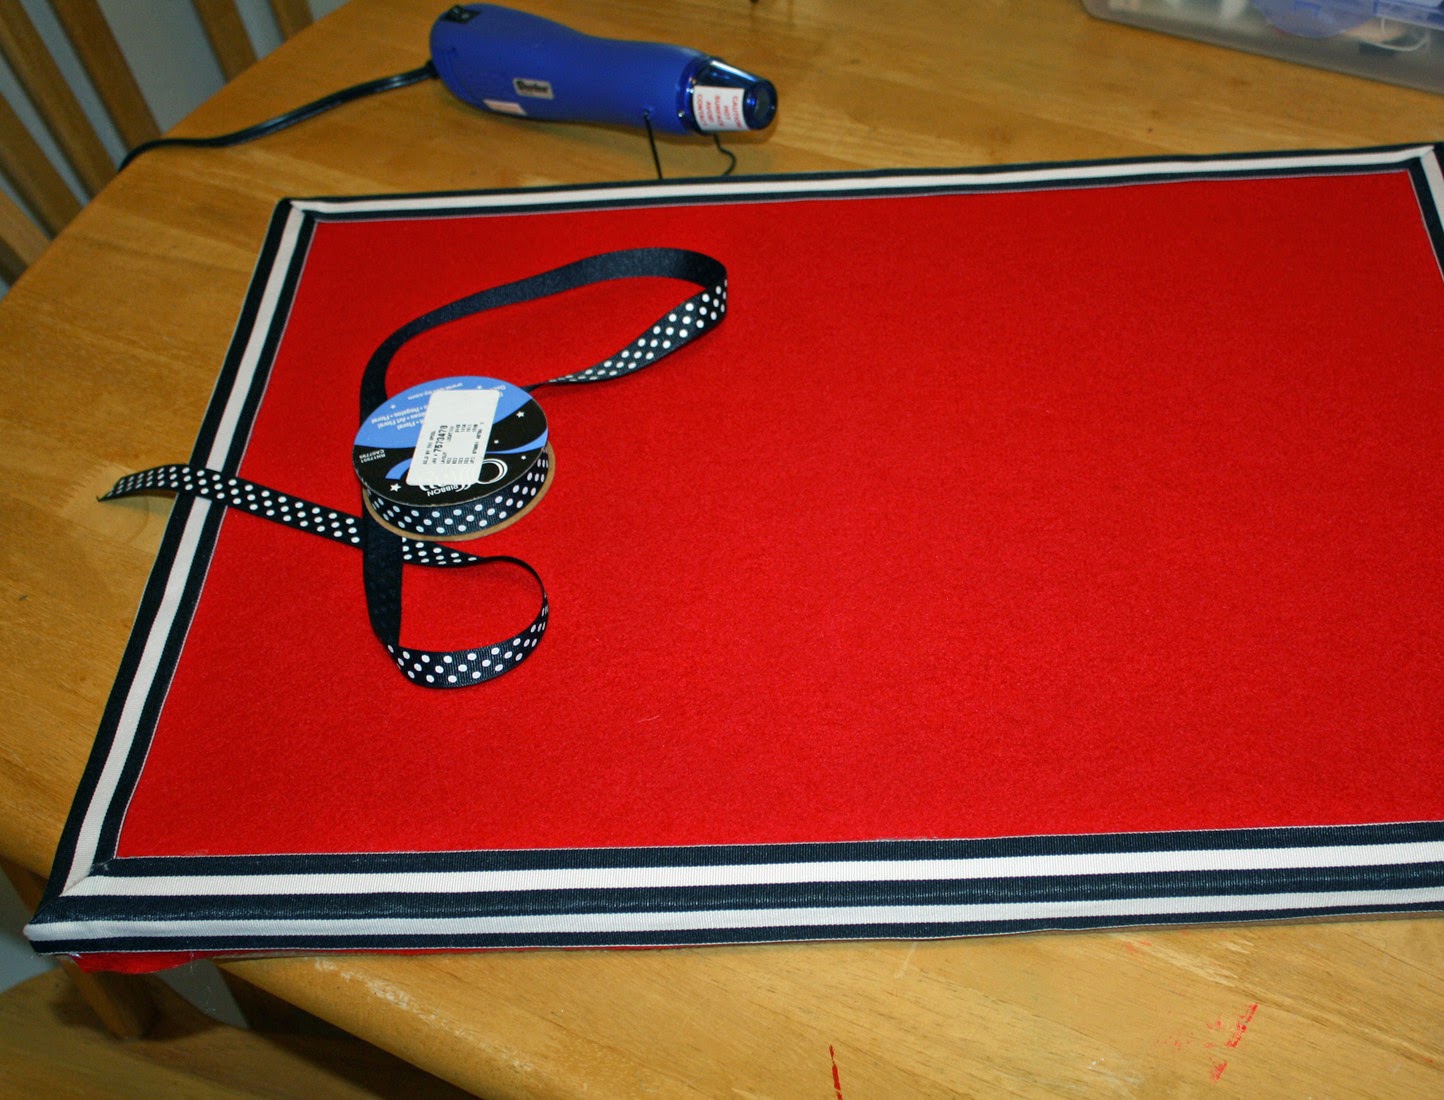
3) I went with a nice piece of better quality red felt for the backing and I have this FAB wide roll of B&W striped fabric ribbon to use for the edges, and decided to also add a second coordinating ribbon (B&W polka dots, narrower width)


4) Used plain ol hotglue to attach everything as it was really the easiest, most secure way - plus I'm super impatient, so - yeah. Cut & glued the cork pieces onto the board, within the framed edges - and cut my red felt large enough so that it would wrap just around the back edges, making sure to pull it evenly tight at each side as I glued it down.

5) Cut lengths of the wide striped ribbon to fie the edges/sides and running a thin line of hotglue tacked those down, mitering the corners so it looked nicer. Since it was striped it was pretty easy to keep it straight & even (though I didn't get it 100% on the top edge, but hey! that's how ya know it's handmade with lovvvve, heh.)


6) I ran a length of polka dotted fabric ribbon around the entire edge of the board in one piece, just putting a quick thin line of hotglue and keeping it stretched taut as I pulled it round. That's it!


Reattached my buttons and hung it back on the wall.
Happy fun project, that's ready to hang more inspiring bits upon -
Have a hophop Happy Easter tomorrow, friends!
XoX, gem