Showing posts with label DIY. Show all posts

Wednesday, October 12, 2011

Upcycled Rice Bag Pillow

Ta-Da! As promised (to myself) I made a quick & easy craft today - one I've been meaning to do for awhile but yaddayaddablah just put it off along with everything else.
Anyway, I've made a cute decorator throw pillow upcycled from a rice bag.


I got a buncha cool ricebags from my friend Patricia over the summer, and I figured I'd either make a tote bag or pillow out of them - the pillow seemed easier and quicker (and just all around more doable with my limited patience and sewing skills)

This one was a practice run with the smallest of the bags - and while I could have gone the "Super Easy Cheaty Route" and just stuffed it as-is with fiberfill and zipped the sucker closed, I didn't! I cut off the top portion with the zipper and handle, re-sewed around the entire perimeter with a straight machine stitch, filled it with polyfill, then sewed the top shut. It's a bit wonky (Unstraight Threadlines! hello, good buddy!) and the top is kinda "rustic" with it's ravelled edging, but I think it turned out cute enough for what was literally a 20 minute top-to-bottom completed project. Including the 5 minutes it took me to rethread my sewing machine, which I still have to haul out the manual for cuz that's how often I use it :D


I ran outta polyfill so I only made the one, but since that was my goal, I'm happy :) And I plan to do a bit more involved of a job on the others and might even use pillow forms on them - we'll see!
Let's hope this is the start of a nice, productive, creative roll for me ...

LATER!
~ gem ~

Saturday, April 3, 2010

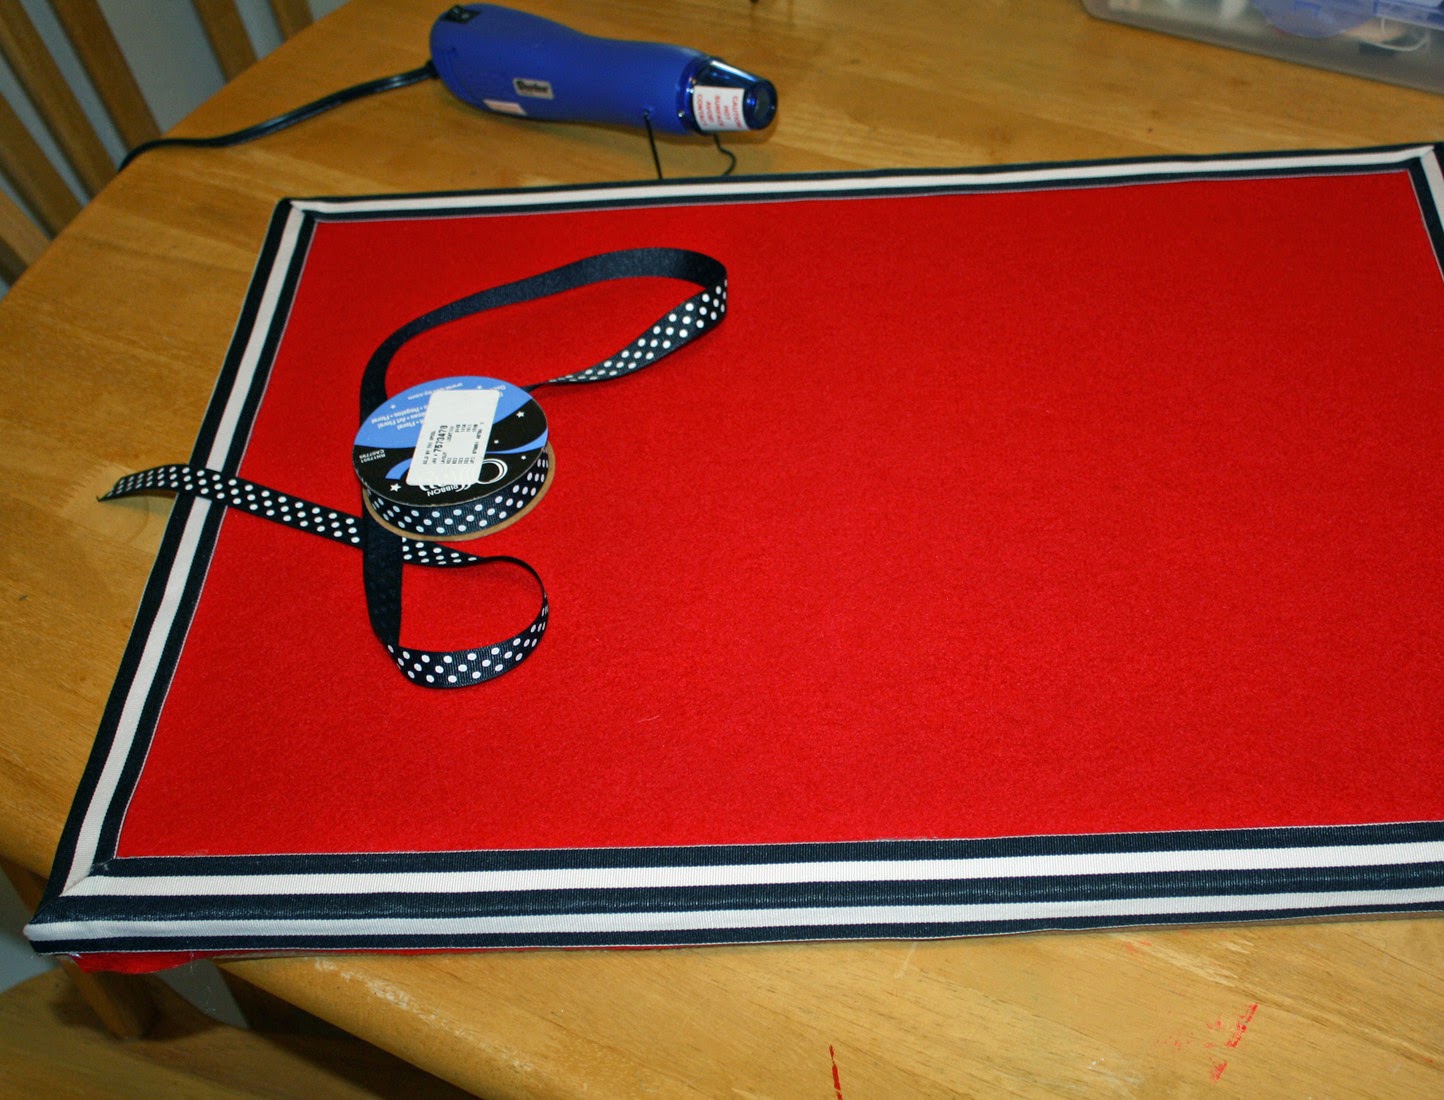
Corkboard Project


Corkboard Project 5
Originally uploaded by gemgirlart
Hi Hello Howareya?!

And yes this is my first blog post of 2010, so Happy New Year as well!
(I'm so lame. and full of shame. and take the blame!)
Anyway I worked on this lil project last month and wanted to quickly share it with you ...

I had an inspiration board hanging over my sewing area - only it wasn'y very inspiring. Plain 'ol wooden framed, cheap mass market cork message board - nice size but corkboards always piss me off due to the fact theres hardly any cork on em! it's like a millimeter thick layer then ya hit particleboard - bah! altogether maddening. I also tried those "cork only" squares that supposedly you can attach right to the wall with doublestick tape? Uh, no. ya can't. I hate that stuff, anyhow, but it was a nice thicker piece of cork, SO! one day I decided 'Hay! Why don't you combine the two?" - and here is what I did:


1) Since the original board was rectangular and the cork squares were, well - square - I had to cut them to fit. Ruler & craft / utility knife were a must!


2) Since I'd be cutting and attaching the cork squares to the wooden framed board and there'd be a buncha ugly seams leftover, I decided I'd also go ahead and cover it with fabric and edge it with ribbon, too. This would also make it way easier to reattach my button collection to the outer edges of the board (through the fabric ribbon instedda into the cork - brilliant!)

3) I went with a nice piece of better quality red felt for the backing and I have this FAB wide roll of B&W striped fabric ribbon to use for the edges, and decided to also add a second coordinating ribbon (B&W polka dots, narrower width)


4) Used plain ol hotglue to attach everything as it was really the easiest, most secure way - plus I'm super impatient, so - yeah. Cut & glued the cork pieces onto the board, within the framed edges - and cut my red felt large enough so that it would wrap just around the back edges, making sure to pull it evenly tight at each side as I glued it down.

5) Cut lengths of the wide striped ribbon to fie the edges/sides and running a thin line of hotglue tacked those down, mitering the corners so it looked nicer. Since it was striped it was pretty easy to keep it straight & even (though I didn't get it 100% on the top edge, but hey! that's how ya know it's handmade with lovvvve, heh.)


6) I ran a length of polka dotted fabric ribbon around the entire edge of the board in one piece, just putting a quick thin line of hotglue and keeping it stretched taut as I pulled it round. That's it!


Reattached my buttons and hung it back on the wall.
Happy fun project, that's ready to hang more inspiring bits upon -
Have a hophop Happy Easter tomorrow, friends!
XoX, gem

Tuesday, October 6, 2009

Paper Alpha Project

Finally! A new post, and a "new" project :)
Follow along if ya wanna make something similar (not that ya couldn't figure this out on yer own, I mean really. How easy could a project BE?)

Paper Covered Wooden Alpha Wallhanging

STEP 1


Choose your letters and papers. I'd wanted the word CREATE to hang above my artspace, and my kids got me the letters for like my birthday or Mother's Day (LAST year.) and so I already had them here. Mine are white-painted wood and about 7" tall. If you've been to the craft shop or discount store you KNOW they have a dozen styles to choose from, so just get whatever size or type you like! Then I collected up some semi-complimentary scrapbookpapers, but you could use bits from your scrapbox, vintage book pages, wrapping paper - whatever!

STEP 2


Apply adhesive to the FRONT of your letters. I used gel medium, but you could use whatever type of glue ya want - even a gluestick. Yep. Gluestick.

STEP 3


Lay your letter facedown on the paper - I'd precut mine to about the size of the letters, and lined up at least one edge, just to make the cutting easier and to not waste too much of the paper. You can also hold it up to the light and see if you like the "arrangement" of pattern on the letter and if not scoot it around - if ya use repositionable glue - that, or figure your approximate placement before applying glue. I didn't care so I just went with the "however it lies" approach :D

STEP 4


Press down real good! You want your paper to be really well adhered to the letter, so make sure you press out any bubbles & wrinkles, and really get the edges good too.

STEP 5


I had a sort of assembly line process, so once I did the previous steps for each letter, I stacked'em up to let them dry. I actually let them dry/cure overnight, but not for any benefit - I just ran outta time to work on them any further the 1st day :D But yeah, they should be completely set & dry before ya cut.

STEP 6


Cut away the excess paper. Now, the way you do this is kinda up to you & however you find it to be easier. I used a craft-knife and laid the letter flat & facedown on a cutting mat, and trimmed around the edges. I found it to be a little hinky 'cause the wood was pretty soft and my blade kept digging into it. So on some I tried using scissors on the edges, and the blade to cut out the middles (like on the A and R) - I say it's your choice because no matter how you trim the paper away, you are still going to have to do the next step:

STEP 7
(for which there is no picture cause I was so busy and focused on it I forgot to take one.) But you need to sand all the edges now - both to remove any leftover hangy-bits of paper, and to sorta age the edges a bit (if that's a look you wanna go for). I used a foam sanding block - I think it was actually a nail file thing for fake nails, but it works great cause it's flexible and can mold to the shape of the letters plus it's got a few different "grits" of sanding material. So anyway I just used that to rasp off whatever paper was uneven or leftover along all the edges of the letters. I also took this time to reglue any loose paper along the corners and edges. There weren't many 'casue I'm a pretty good gluer :-p

STEP 8


Now you can skip this step if you want, like if you used really pretty coated or fancy papers or something - but I went ahead and sealed mine with some acrylic sealer - I used matte finish here but you could go gloss or spray it with glitter or whatever the heck!

VOILA and FINI!
You are now ready to hang your fab new motivational phrase (or kids name or house numbers or whatever you made!) on your wall - go for the funky haphazard "drive a nail and hang the letter" approach or do the anal retentive thing and use a laser level and snap a chalkline (hello! - waves to all you Type A's out there - hehe) All I really ask it that you #1) don't wait a year to complete this super simple project like I did, and B) ENJOY IT!


*plus I dig that if you mess up or just wanna do a different look later- you can just yank'em down and recover with something else! Like you don't have about 169 pounds of random scrapbook or saved papers lying around to pull from. You know you doooo. And they're just sitting there. Mocking you.

SO MAKE THIS CRAFT. TODAY.
or at least this weekend ;-)


xox, gem


*** UPDATED APRIL 2014 ***
Just to show you - I've since re-papered those letters (a couple years ago actually) and moved them into a different spot:


Plan to do a studio room tour in the near future! so you can see this whole space :)